This is a sister post to Put The Block Part 1a. It’s going to be considerably dryer, more technical, and hopefully less unhinged, and is gonna go into the details and hardships that I’ve had to consider and overcome during my work so far on my new game agnostic score website, Put The Block.
What Is Put The Block
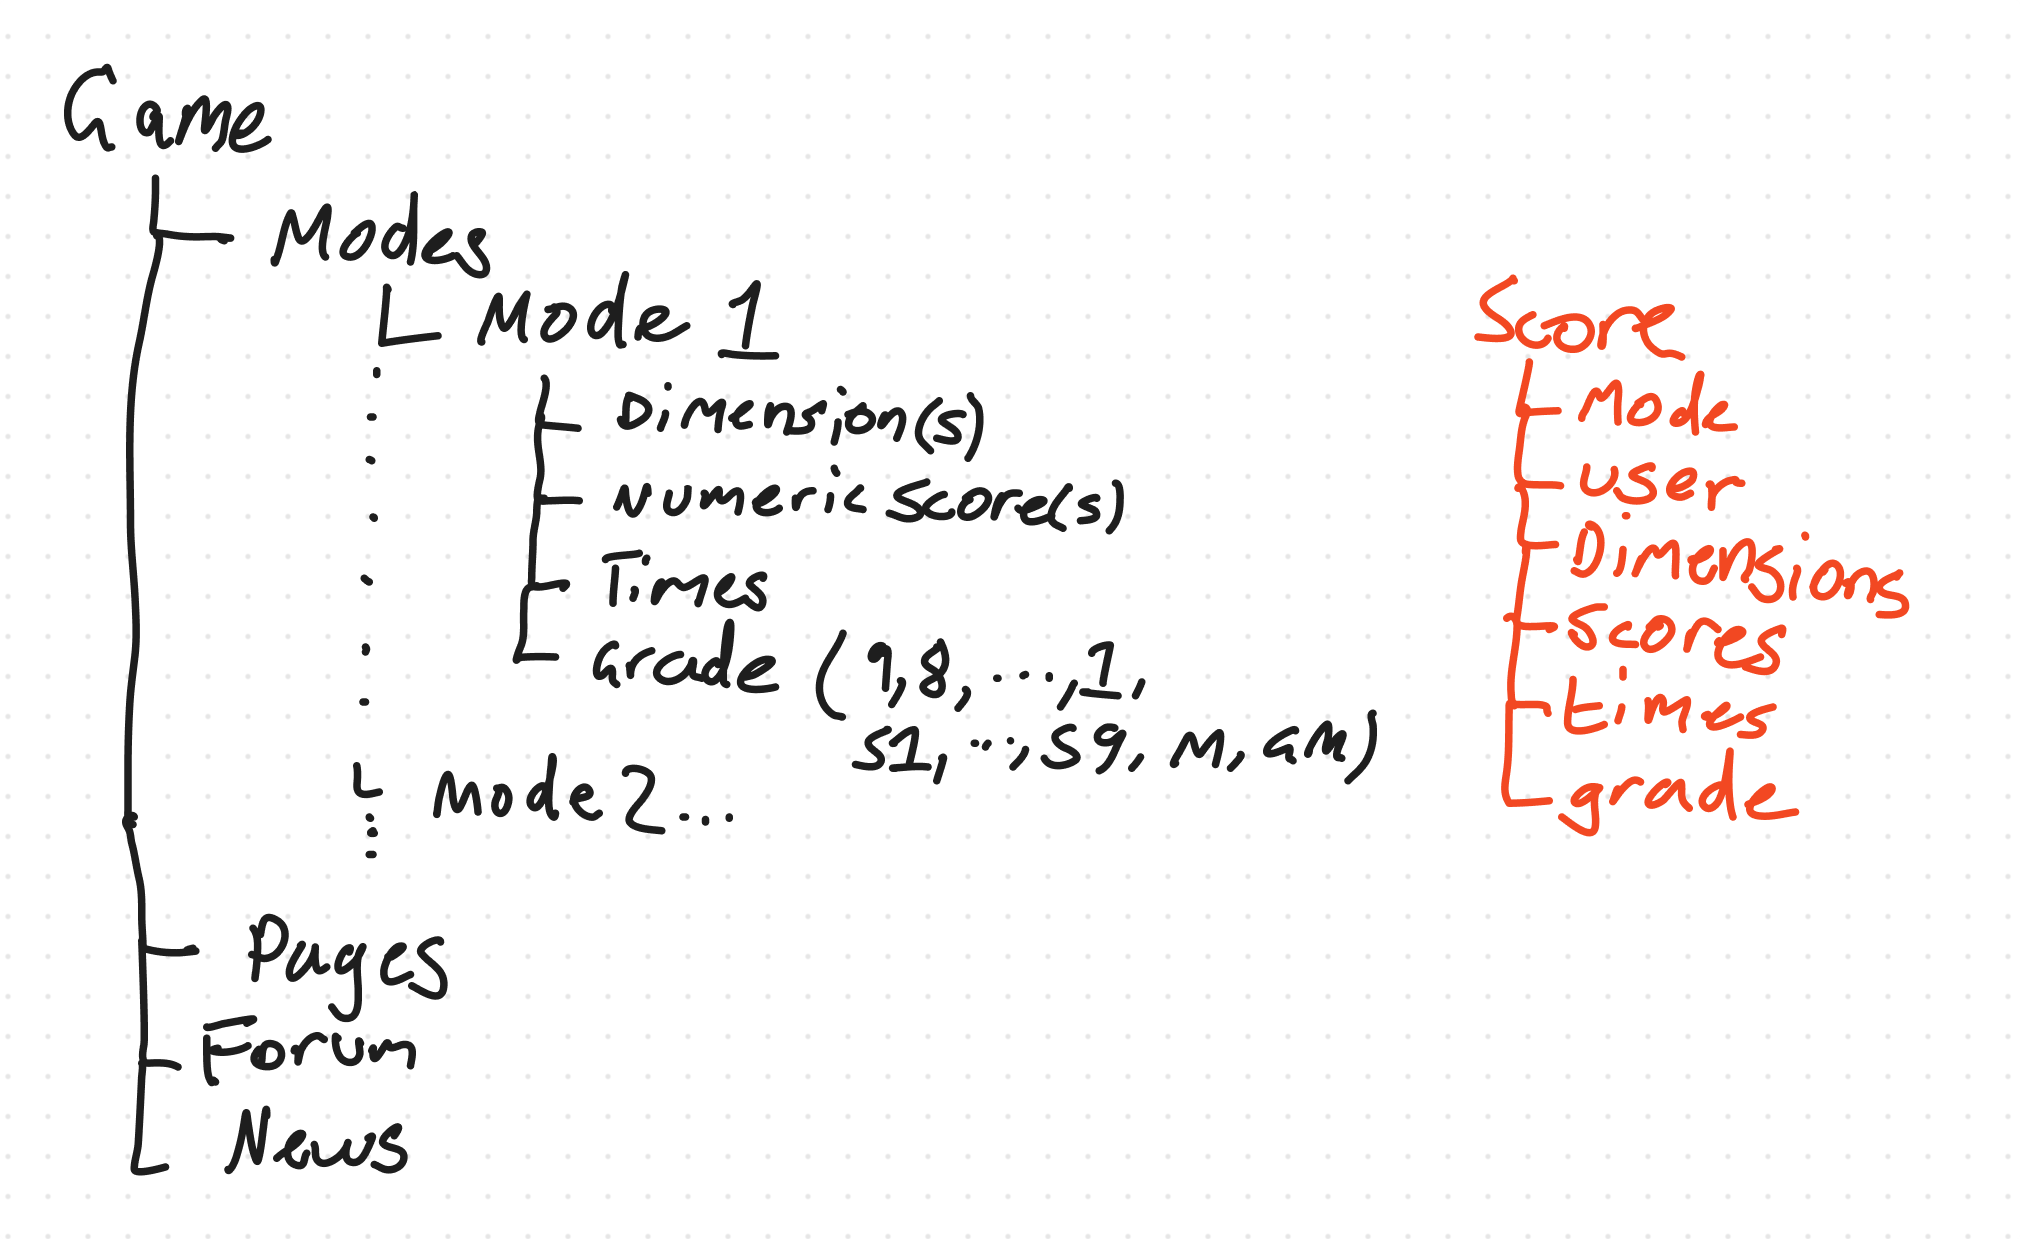
For those who found the other post too cringe, basically what I’m trying to do is build a website similar to speedrun.com, but with the primary focus being to be a game-agnostic score database for third party Tetris clones, with an API that will allow players to upload their scores directly (and potentially automatically) from in game. The bare minimum that I would consider a viable product is to have a user profile, a game area, and a set of modes for each game. Heres a list of the terminology I’m using throughout this project. I’m going to assume at least a basic level of knowledge about Tetris terminology, but more detail on that can be found here.
- A “Game” is the topmost collection of data about a game, and includes its modes, as well as other game-specific features such as pages, news and forums.
- A “Mode” is considered as a leaderboard, or set of leaderboards with the same set of columns.
- A “Column” is a field that is stored for each leaderboard entry and falls into one of two categories
- Dimensions. These are (optionally filterable) fields that display details about a leaderboard entry. This could be used for details such as what rotation system was being used, the framerate settings used in game, or for mode specific settings.
- Metrics. These are sortable fields that store the various scoring values of a leaderboard entry. This could be a numerical score or line count, a time, or a grade.
- A “Grade” is part of a “Grade System”, which is simply an ordered list of string values that represent a game or mode specific scoring system. The most well known is from Tetris the Grand Master where the lowest grade is “9”, and then raises up through “2”, “1”, “S1”, then back up to “S9” before reaching its peak “M” and “GM”.
- A “Score” or “Leaderboard Entry” (I use these terms interchangably) is a set of data specific to one mode that includes that mode’s columns as well as the time the entry was created and the user it belongs to.
Thats a lot of dense bullshit, but hopefully makes a bit of sense. Laid out as a tree, it looks like this.
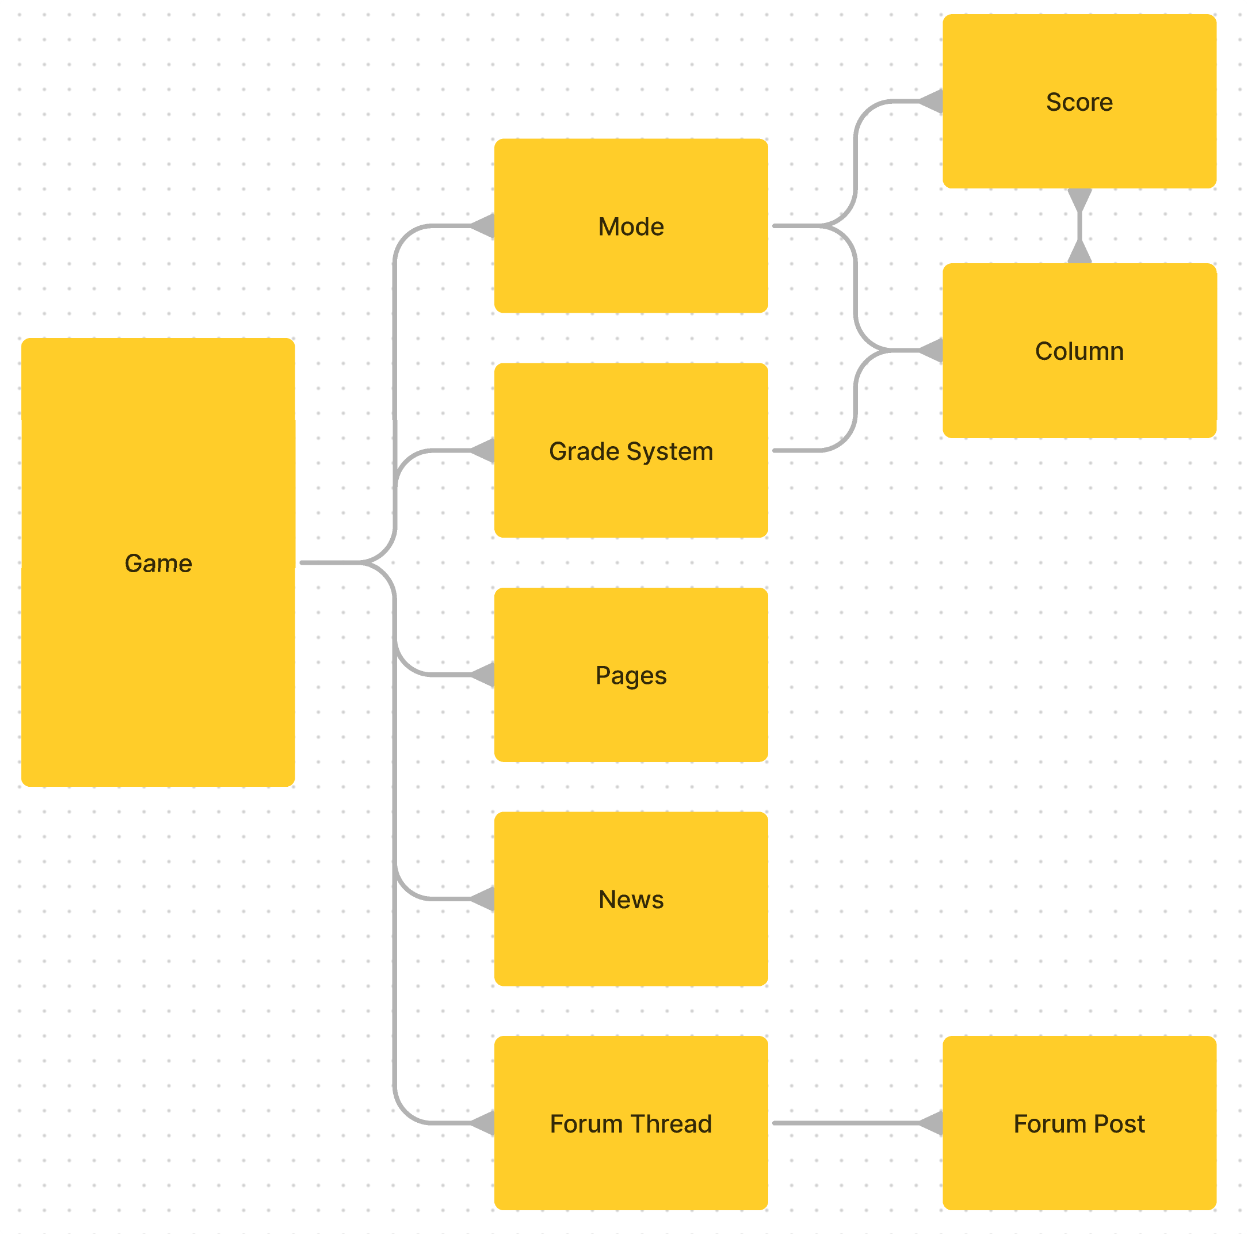
And if we put this into an ER format for those familliar, we end up with
The Technology Stack
Stop me if you’ve heard this one before:
A Python 3.9 Flask app, with Jinja2 templating for webpage serving, and layout/design using Bootstrap.
Thats what I’m comfortable with, I spent a couple years at work using this at work and I know roughly my way around it, albeit I am still self taught, and have no design talent, if that wasn’t obvious by the other post.
There is one other technology that I’ll also be teaching myself as I work on this project, and thats SQLAlchemy ORM. We’ve been using Django ORM at work for a little bit and I think I’m starting to get the hang of using an ORM instead of raw SQL for websites now. By no means does this mean I’ll be moving my Discord bot, 42, over to an ORM, I far far prefer the control of raw SQL in that context, but over here I’m willing to give it a try.
The database engine I’m using is Postgres, but due to some limitations with the hosting I’m using, I’m stuck on Postgres 8.4, with no access to the hstore extension, which is unfortunate for reasons I’ll explain later.
Authentication
This project gets nowhere if I don’t have some form of authentication. But on the other hand, rolling my own authentication is incredibly error-prone and difficult, and I’m just one guy with barely enough experience to make a working website.
I’ve had to implement Google SSO for work and let me tell you, it’s not pretty, so instead I’ll be using something a lot simpler: Discord Oauth2. And by “using” I mean “importing”, since this is after all, Python.
I found a library called flask-discord which will handle all the authentication, user context, and cookie management for me, I just need to give it an application secret, a callback URL, and the scopes I need, and it’ll handle the rest for me.
This means that I can quite easily gain access to a discord.py User object from which I can obtain an ID, username and avatar to use in Put The Block.
from . import app, discord
from flask_discord import Unauthorized, requires_authorization

@app.route("/auth/login")
def login():
  return discord.create_session(scope=['identify'])

@app.route("/auth/callback")
def callback():
  discord.callback()
  user = discord.fetch_user()
  # database stuff here for later
  return redirect(url_for("me"))

@app.errorhandler(Unauthorized)
def redirect_unauthorized(e):
return redirect(url_for("login"))

@app.route("/auth/me")
@requires_authorization
def me():
user = discord.fetch_user()
return f"<html><head><title>{user.name}</title></head><body><img src='{user.avatar_url}'/></body></html>"
I was actually impressed at how well this worked when I first tried it. I hit authorize on the Discord link that it opened, and then my icon appeared on the screen. Going to /auth/me directly without being logged in automatically redirected to the login, it was perfect!
There are a few other bits I needed to store alongside the user, so I wrote a user table, and a utility function to get the logged in Discord user and their corresponding PTB user. This allows users to have site permissions, bios, display names, custom urls, and a bunch more bits.
Picking a Database
This part was actually quite difficult to figure out.
I started off with only the initial plans: Figure out how to have a set of custom fields on each score object, in a table that is mode-agnostic, but in a way that those scores are still filterable.
I initially tried to figure out a way to do it without normalising the data, e.g. storing a key-value store field, or object field, or json field, but I just couldn’t find anything, and to make matters worse, MySQL didn’t have an ordered list field that I could use for storing things like grade systems. I’d done a bunch of stuff for work with PostgreSQL, though, and that included a lot of incredibly cursed jsonb_object functions in select statements, so I thought that maybe Postgres would do what I need here since json data is both a key value store, and natively filterable in pretty much all modern versions of Postgres.
Pretty set on this plan, I set out to see if I could create a Postgres table, aaaaaand no dice. My current hosting plan only allowed me to use MySQL databases, which like, is enough for running a few wordpress blogs, but isn’t right for my use case.
But turns out that an upgraded hosting option was available and it was only £40 more expensive per year, which I can work with. So now not only do I have access to Postgres, I also no longer have a 19GB limit on the combined size of all my databases, which is a nice bonus. Still stuck with a 300k inode limit on the filesystem though, so I still can’t use this host as an image store or filesharing site, but having no limit on the database space comes with the unexpected benefit of being able to store things like Cambridge Replay (.crp) files, which are on average 50-300kb of text data, as blob data in the database directly.
So I set up a Postgres database, and tried to create all my models, when I get an error that I can’t create a field of type Json. Concerning, but I’ll dig into it.
Turns out that the Postgres version on my shared hosting is 8.4, and I have no avenue to upgrade it. Very unfortunate. Can I use hstore? Of course not. I’m going to have to normalise this table.
And in terms of database handling, thats about where I am with it.
I got overwhelmed and exhausted at the thought, and thats why I’m writing this devlog actually. It’s something to keep myself in the headspace of PTB whilst also recharging my mental energy.
Making The Webpage
Before I could start making any pages, I actually decided to make the navigation stuff first to get the top nav-bar going. I’ve mostly done this using bootstrap documentation as a guide and trying to order things to get the look that I want.
On the left is the branding, in the middle is a search bar that doesn’t go anywhere yet, but will eventually be used to search for games and users, and on the right is either a login button or the user dropdown.

The dropdown on the right has a link to the user’s profile, and non-functioning links that will eventually lead to the user’s score page, and a logout button.
In terms of branding, I realised that, while “hoo ha tetromino letters” is a concept done to death, I could use pentominoes instead and fit the P and T letters together quite neatly. I’m less satisfied with the “B” being tacked on the end, but it’s grown on me since I made it. I made the logo as a 80×64 px png in GIMP, and based my design on a block skin I happened to particularly enjoy from back in the days where Tetris Friends was a thing. A cute bubbly looking connected texture skin that has the benefit of making the letters a little bit more defined.
![]()
To make this webpage, I’m using Jinja2 and Bootstrap, and mostly writing my own HTML files for the layout. Broadly speaking, I have a base.html with 4 blocks in, “theme”, “headers”, “title” and “content”.
- Theme is placed inside the “data-bs-theme” attribute of the html tag and is set to “auto” by default. This allows game pages to override this attribute to be “light” or “dark”.
- Headers just adds stuff to the head element
- Title is inside the title element and is followed by ” – Put The Block”, it’s just for pages to set their own title.
- Content is where I put all the content of the relevant page. It’s inside a container div below the navigation.
The base html defines the navigation as well as handles importing Bootstrap and Popper.
While the index page doesn’t have anything on it yet, I’ve been using it for general testing. Currently it’s doing some colour tests for me,
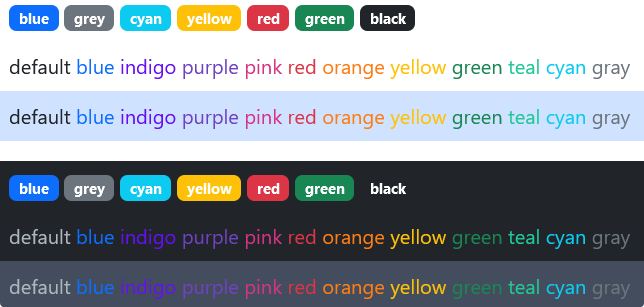
The reason for this is because I wanted to make the different main colours available as username colours and was checking to see how they look. Bootstrap doesn’t have text classes for these colours though, so I had to roll them myself, which wasn’t too difficult
{% for colour in ["blue", "indigo", "purple", "pink", "red", "orange", "yellow", "green", "teal", "cyan", "gray"] %}
  .user-{{ colour }} { color: var(--bs-{{ colour }}) !important; }
{% endfor %}
Just makes all these available to me as .user-colour which I can add to username spans to recolour names. The blocks above are for the lil tags that appear next to the username. If you saw the screenshots in the other post, thats the blue “Squishy Webmaster” badge next to my name.
User Area
This is where the first big chunk of feature expansions came along. Initially the plan was just to connect to a Discord user and use that as the ID, but then as I was building my database models, I came to the conclusion that I needed a user table to use as a foreign key into scores and permissions. But having a user table made it possible to add more attributes to the user table, such as name colour, badge text/colour, a custom URL and display name1, and even a space for the user’s TETR.IO username.
Since I’m not good at designing and laying out a webpage, I’m going to be leaning incredibly heavily on Bootstrap’s rows and columns for layout out attributes, and cards for spacing and sectioning things out. Cards provide me with a decent area with a consistent style and background, a header I can use to give sections different labels, and I can add the “mb-4” class to the card to space them out from each-other on the page.
Within each card, I’m mostly using columns where I need side by side data, or else I’m letting the content do its own thing.
The user area is accessed via either /users/<name> or /users/@me, with the difference being that the latter fetches the logged in user. When I render the page, I’m passing the templater a copy of the PTB user object that it can pull a bunch of data from, and then going from there. Some sections are hidden unless certain fields are present, for instance if the user hasn’t set a country then no flag will be sent, or if they have turned off the setting to display their Discord username, then that will be hidden on the profile.
Speaking of flags, I looked through a couple of solutions for flags, but didn’t like any of them, so I just downloaded a folder of SVGs from GitHub to serve as image files instead.
The other parameter sent to the templater is “editable”. If this variable exists, regardless of its value, the “Edit Profile” button gets drawn in the first box, which takes the user to /users/@me/edit. There is no reason to specify the endpoint for /users/<name>/edit, since a user will only ever be able to edit themselves, for now, this might change when permissions get more sophisticated, but for the time being if I have to edit a user, I can use the admin panel for it.
Editing the page is using the same set of cards, except this time each of them is populated with a set of form fields corresponding to the details of each card.
Forms Technology
So I’m using a library called WTForms, and a pair of extensions called Flask-WTF and WTForms-Alchemy. This makes using forms in flask a lot easier as I don’t have to deal with parsing out form data from the request or doing the validation myself outside of a few edge cases. WTForms-Alchemy is especially nice as it provides me access to the QuerySelectField, and while I’m not using it on the main website yet, it will become incredibly valuable later on, I just have to figure out how to set up the query selector factory to take a filter argument first though.
Once it’s all rendered out, I end up with something that looks like this
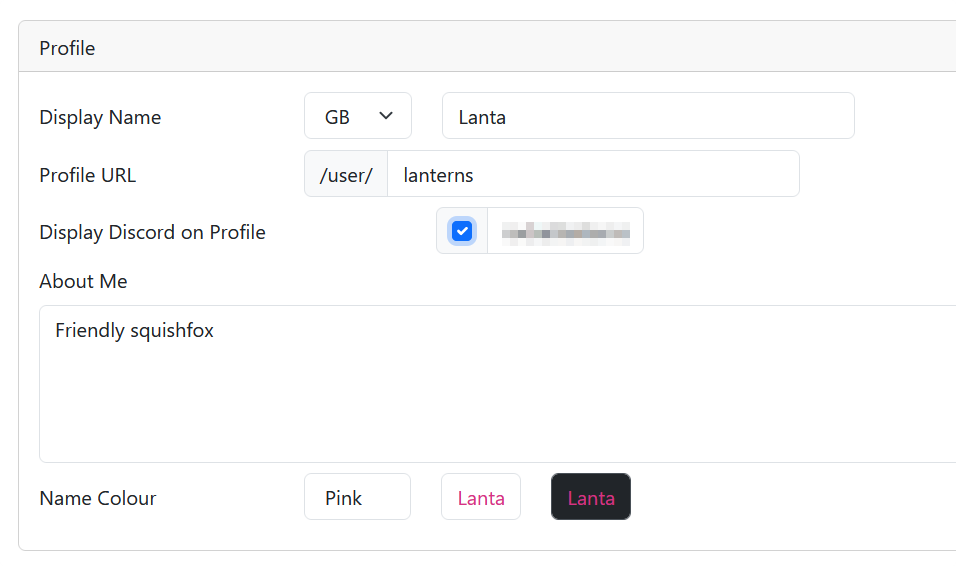
I’ve actually done some fun tricks here with a bit of custom JS because it was simple enough to be something that I could do. You see those two boxes at the bottom? Those dynamically update based on the values of the Display Name and Name Colour fields so that you can preview how your name would look on both themes.
The Admin Panel
I have one more thing I want to talk about, and its an admin panel thats been set up using Flask-Admin. For as nice as it would have been to be able to just drop all of my models into flask admin and have it handle it automatically, unfortunately it’s not that simple.
For instance, either I’m missing something, or Flask Admin doesn’t natively handle relationships and/or foreign key fields. I’m also using a bunch of code to add bit-fields to my models using properties. Those are requiring me to make custom forms though in order to set the value of each of those properties in a more intuitive way than manual calculations and number inputs. Not difficult, just tedious.
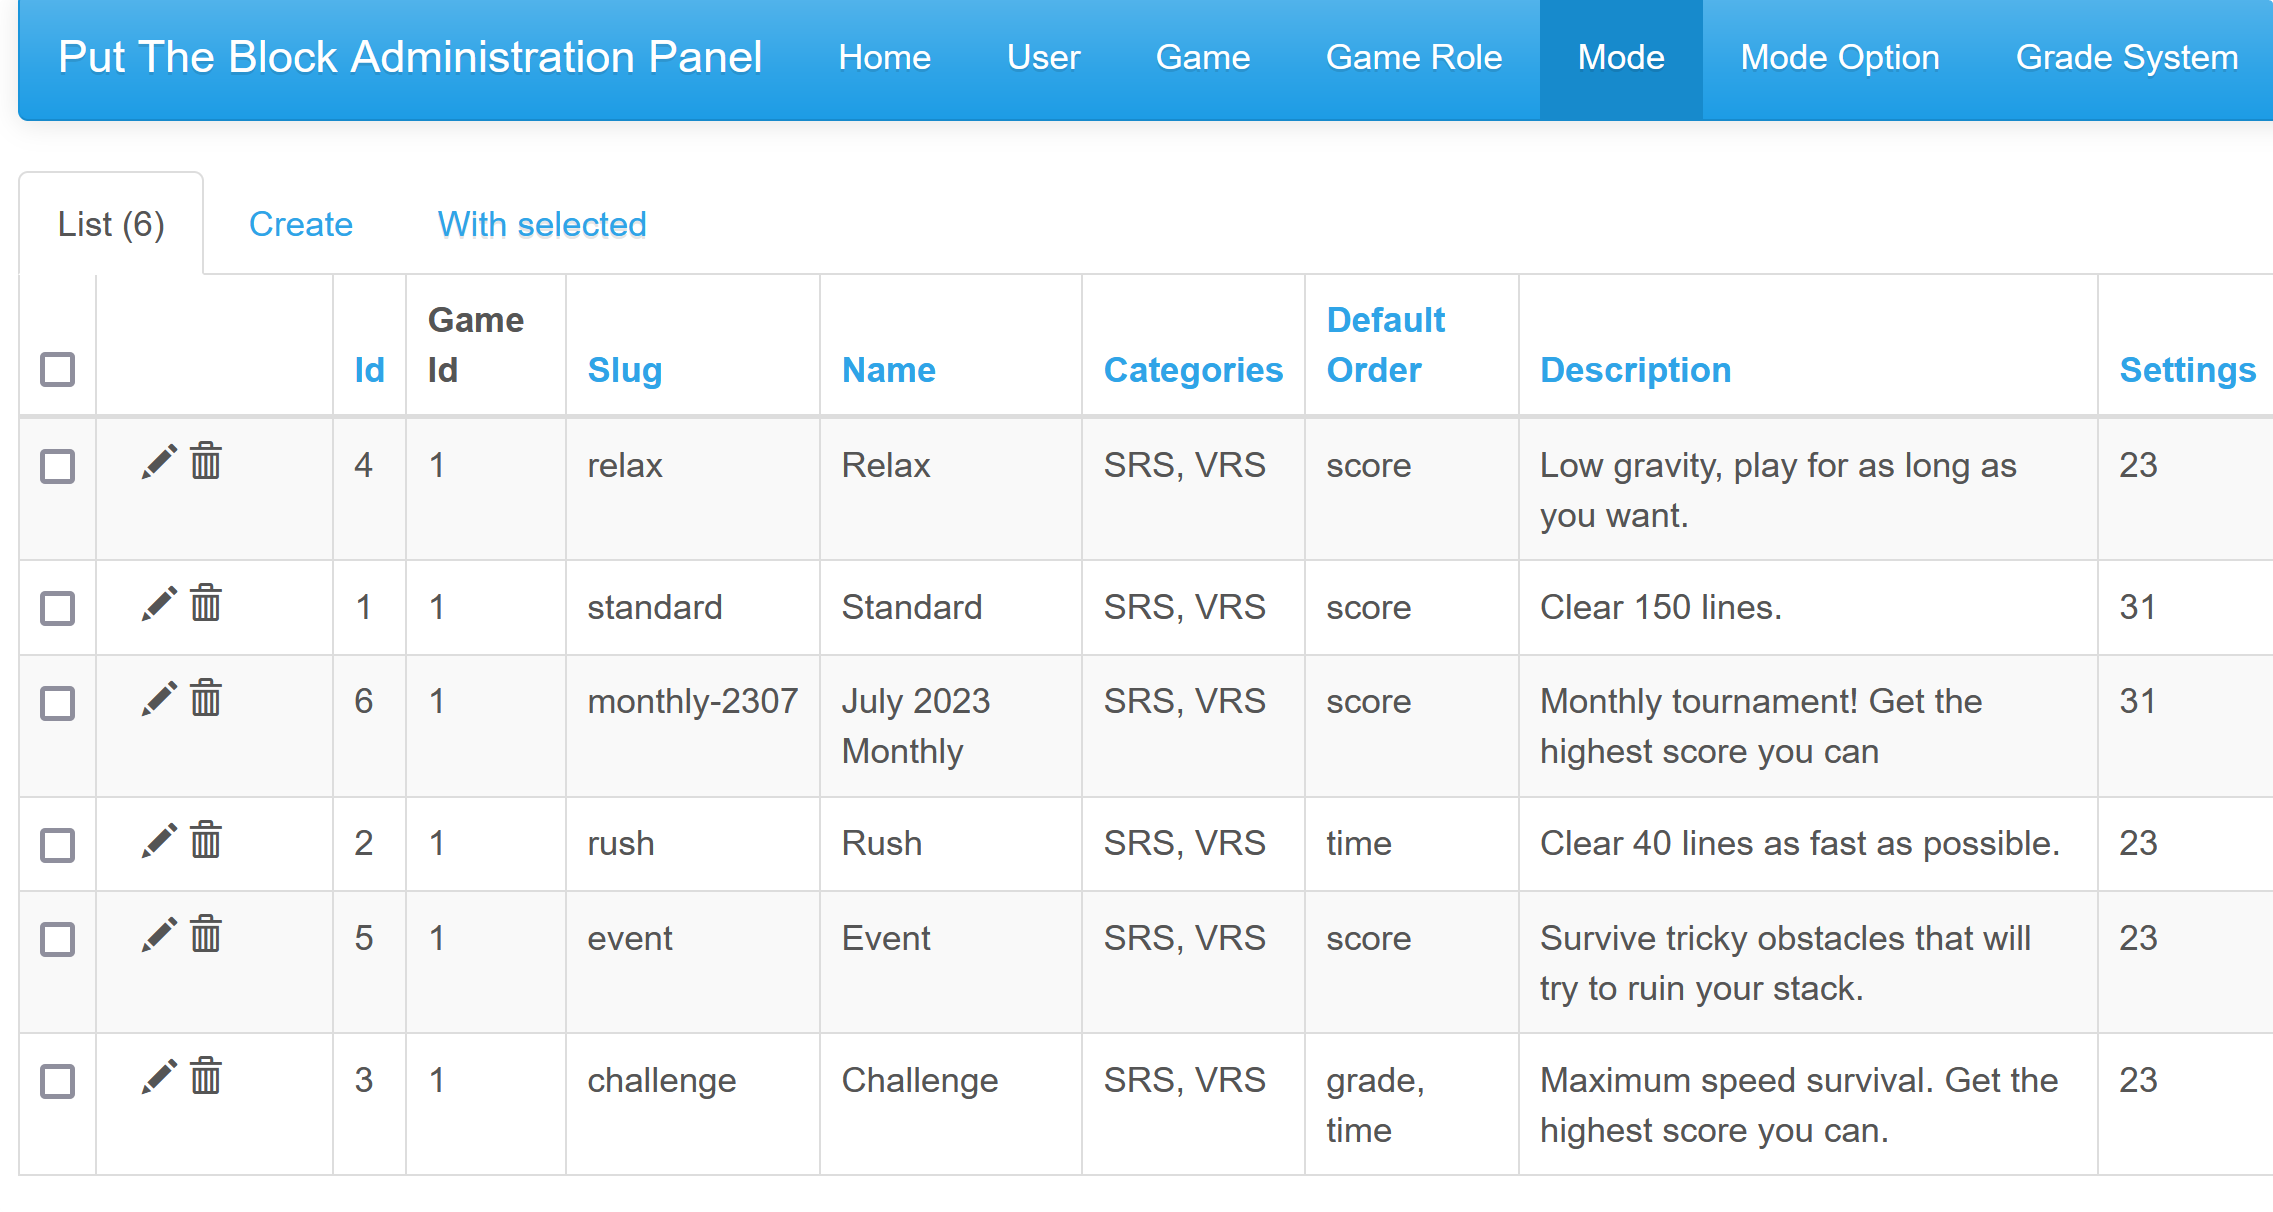
The “Settings” on the right is just a number, but behind the scenes, it’s actually a bit-field. If anyone knows how to make flask admin display properties of a model, do let me know.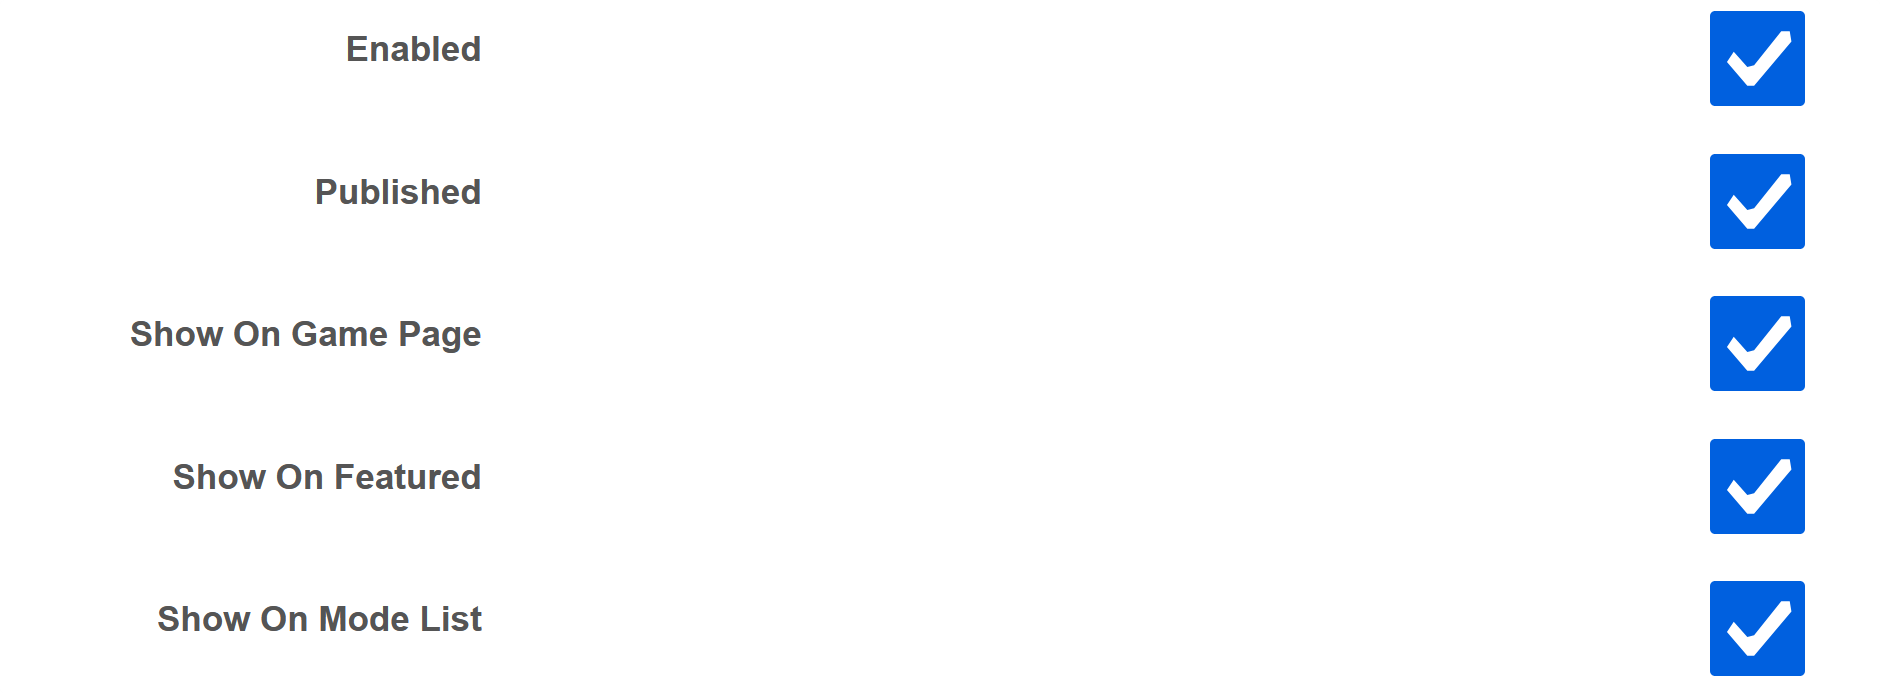
(The list of values inside the bit field.)
One other thing about flask-admin is that it comes bundled with some custom fields, Select2TagsField and DateTimeField that come with super fancy dialogues for inputting values, and I’m gonna have to see if I can get those working outside the context of flask admin, as they would be super helpful for setting up modes and stuff.
Next Steps
I have a set of normalised mode, column, and score tables that I need to try and turn into a leaderboard when I give it a mode ID.
It sounds simple on paper, but frankly it’s exhausting me just to think about it. Hopefully the ORM will be able to carry me on this, because writing all the SQL myself would just exhaust me even more in this case. Curse you, database host, and your severely outdated version of Postgres.
If I was able to store scoring metrics as a json field, I’d be able to filter them using @> and sort them using -> and it would just be super easy, but instead I have to work through normalised tables.
I might just have to use the ORM to get all the data into object form, and then sort them using python though, who knows. I’ll probably post another update when I’ve made significant progress, if not, oh well, I’m at 3000 words here now at least, so it’s not like I’ve left y’all with nothing. I’m gonna go make food then get back to the grindstone.
1 I’d be content just using the Discord display name, but as of writing, that information isn’t quite available yet, and Discord usernames now no longer have the security-through-obscurity of discriminators to hide people from random friend requests. Thats why there is an intention here to keep a user’s Discord identity private unless they specify that it should be displayed.
Leave a Reply