At the end of my last post a little while ago, I had a normalised database, which tbh, I’m going to be sticking with for the time being. I’ll just make some utility functions to fetch high scores, and some attributes on relationships to get the metrics for them, and unfortunately right now I’m kinda sorting in memory. I can go into the details of that if people want, but less of that, I’ve done something very big.
Game Homepages
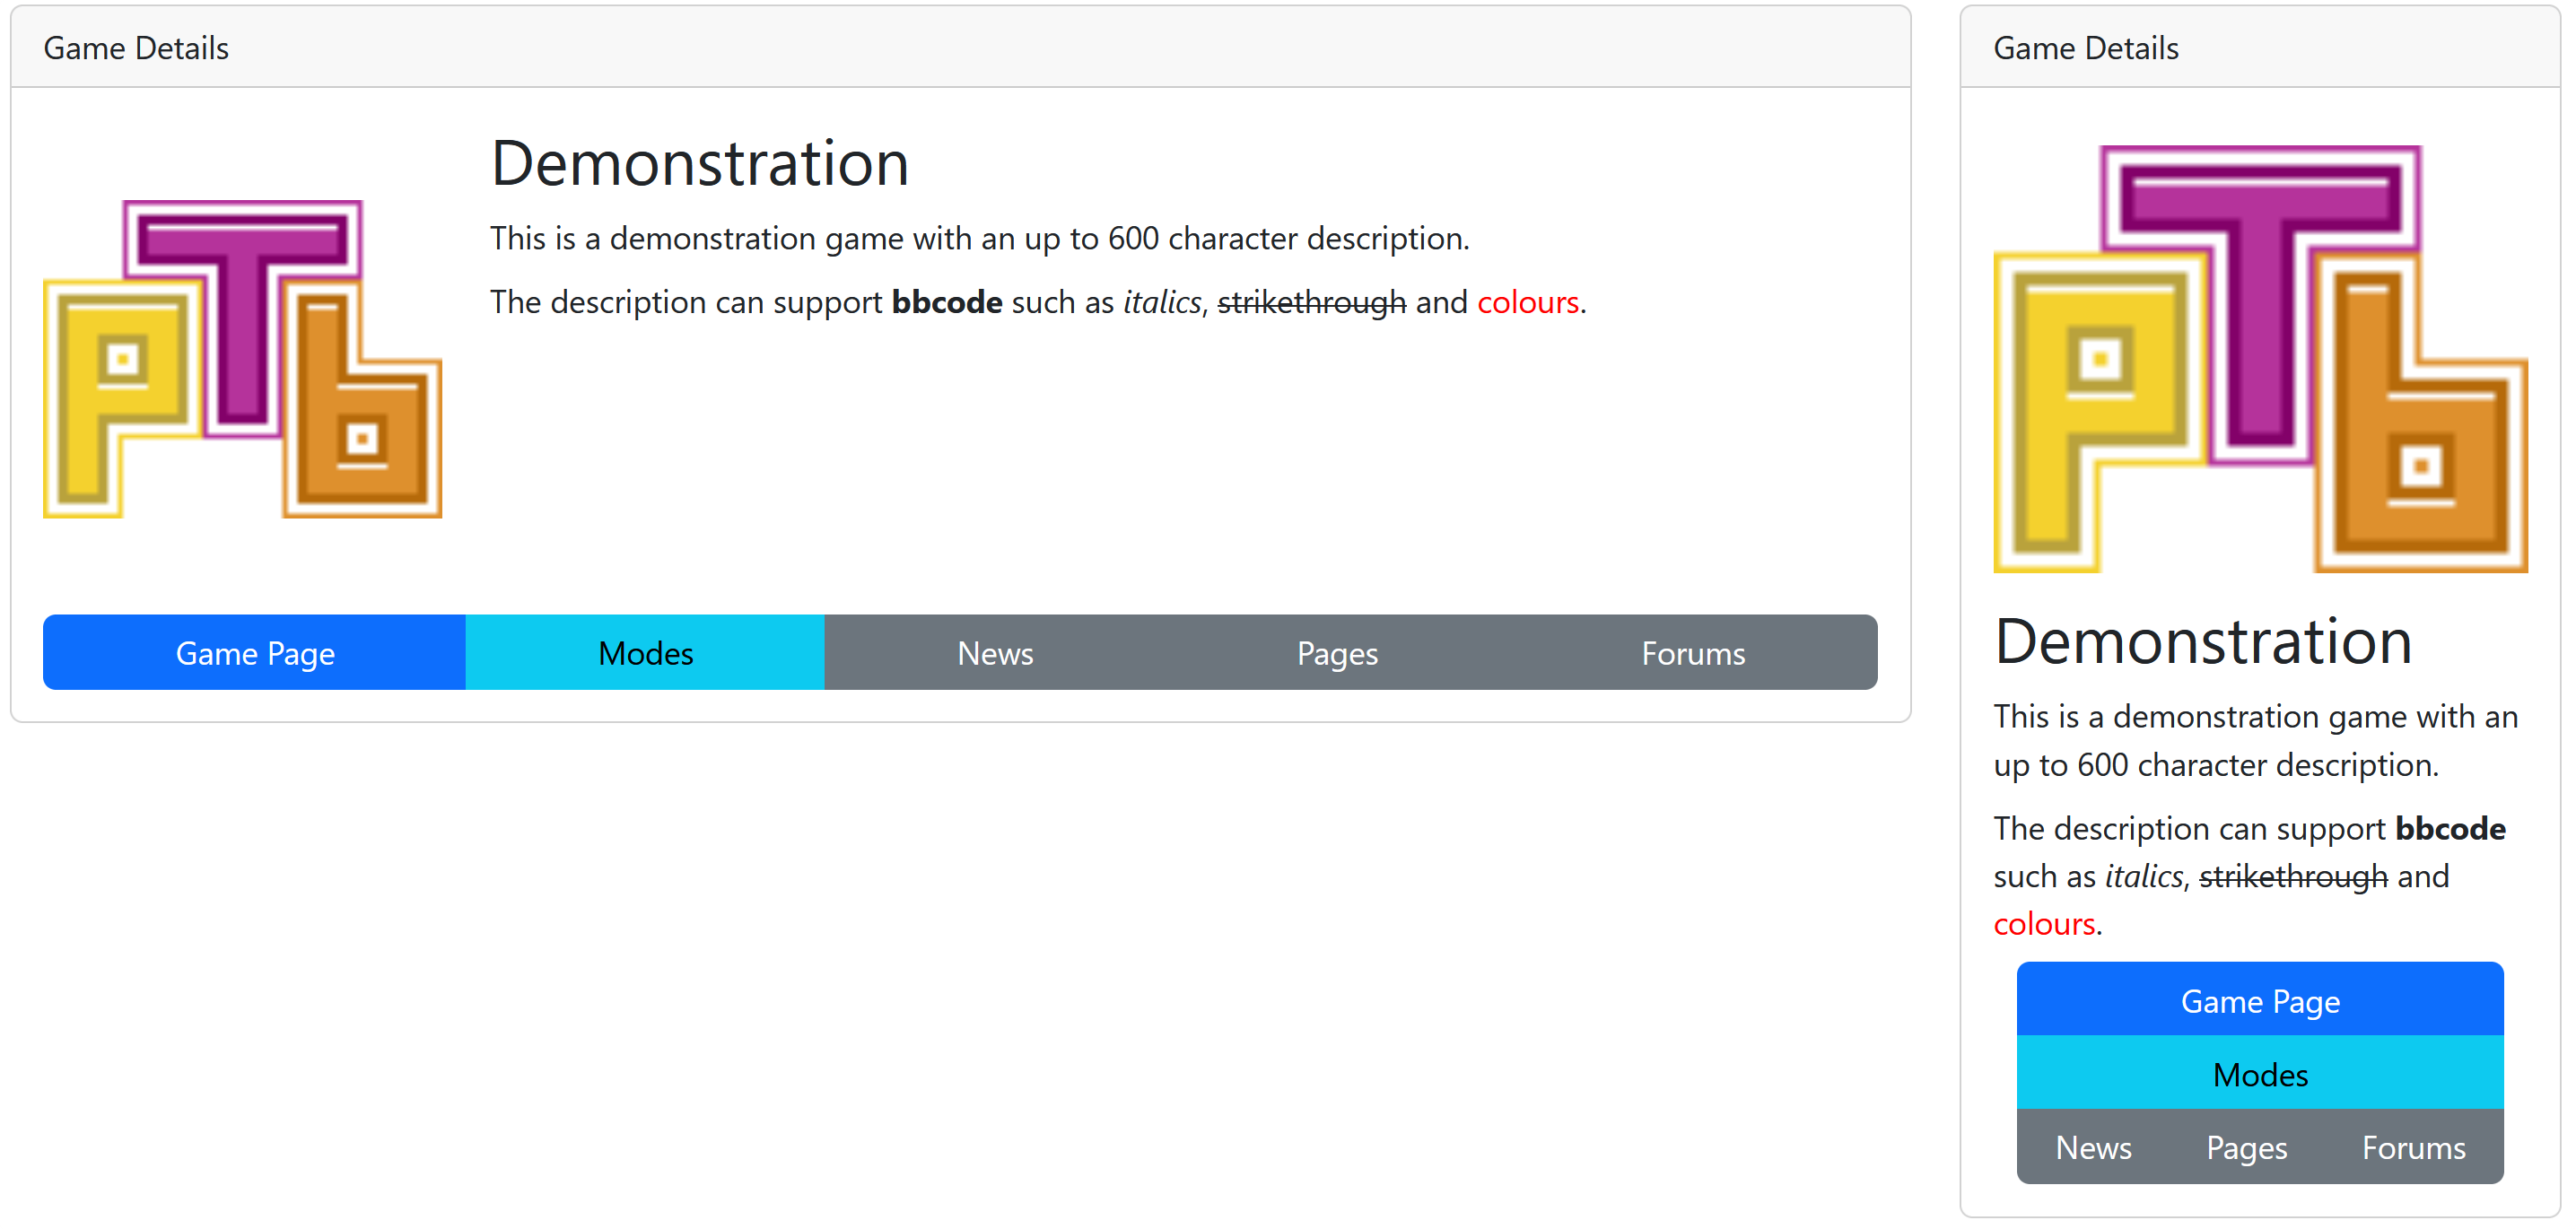
So my initial plan was simple. In fact I posted some mockups in part 1a, here they are again for reference:
Pretty neat design, right, every element is a distinct set of information, hell I even joked with a few friends that it might even be possible to rearrange the cards. In the end though I decided thats probably not the best course of action.
Anyways, I started implementing these cards. The nice thing is that instead of just having a huge block of html which would be difficult to test with and work on, Jinja2 lets me create macros using {% macro name() %}. Here’s one of those cards as an example:
{% macro pages_card() %}
<div class="card mb-4">
  <div class="card-header">
    Pages
  </div>
  <div class="card-body">
    <ul>
    {% for page in game.pages if page.pin %}
      <li><a href="/games/{{ game.slug }}/pages/{{ page.slug }}" class="link-primary text-body">{{ page.title }}</a></li>
    {% endfor %}
    </ul>
  </div>
</div>
{% endmacro %}
Most of the cards are a bit more complex than this, but this should be a suitable demonstration.
Heres the funny part though, while I was testing my cards, I realised that entirely by accident, the way I was implementing these cards lent itself to being able to customise the order of the cards on each column, and at this point I decided I was going to do two things:
- Write up two versions of each card, one for the main column, and one for the side column.
- If I’m already going to have the code to handle narrow versions of the main column cards, I can responsively switch to these narrow versions after a certain breakpoint.
Lets take a look at the code I landed on to resolve both of these.
{% macro short_pages_card(hide=False) %}
<div class="card mb-4 {% if hide %}d-md-none{% endif %}">
  <div class="card-header">
    Pages
  </div>
  <div class="card-body">
    <ul>
    {% for page in game.pages if page.pin %}
      <li><a href="/games/{{ game.slug }}/pages/{{ page.slug }}" class="link-primary text-body">{{ page.title }}</a></li>
    {% endfor %}
    </ul>
  </div>
</div>
{% endmacro %}

{% macro pages_card(right) %}{% if right %}{{ short_pages_card() }}{% else %}
{{ short_pages_card(True) }}
<div class="card mb-4 d-md-flex d-none">
  <div class="card-header">
    Pages
  </div>
  <div class="card-body">
    {% for page in game.pages if page.pin %}
      <div class="mb-3">
        <div class="row">
          <h3 class="col"><a href="/games/{{ game.slug }}/pages/{{ page.slug }}" class="link-primary text-body">{{ page.title }}</a></h3>
          <a href="/games/{{ game.slug }}/pages/{{ page.slug }}" class="btn btn-outline-secondary col-auto me-3">Read More</a>
        </div>
        <span class="text-muted">{{ page.content | bbcode | striptags | truncate(400) }}</span>
      </div>
    {% endfor %}
  </div>
</div>
{% endif %}{% endmacro %}
The main changes above are
- The initial snippet was renamed to “short_pages_card”, and I made a new “pages_card” with the main column version.
- The “pages_card” now takes an argument, which is whether it’s being shown on the main or side column. On the main column it outputs it’s html, on the side column it calls “short_pages_card”.
- “short_pages_card” now takes a hide argument, which when set will add “d-md-none” to the class list of the card. This combined with the main column card having “d-none d-md-block” means that above md, the main card shows and the short card is hidden, and below md, the opposite.
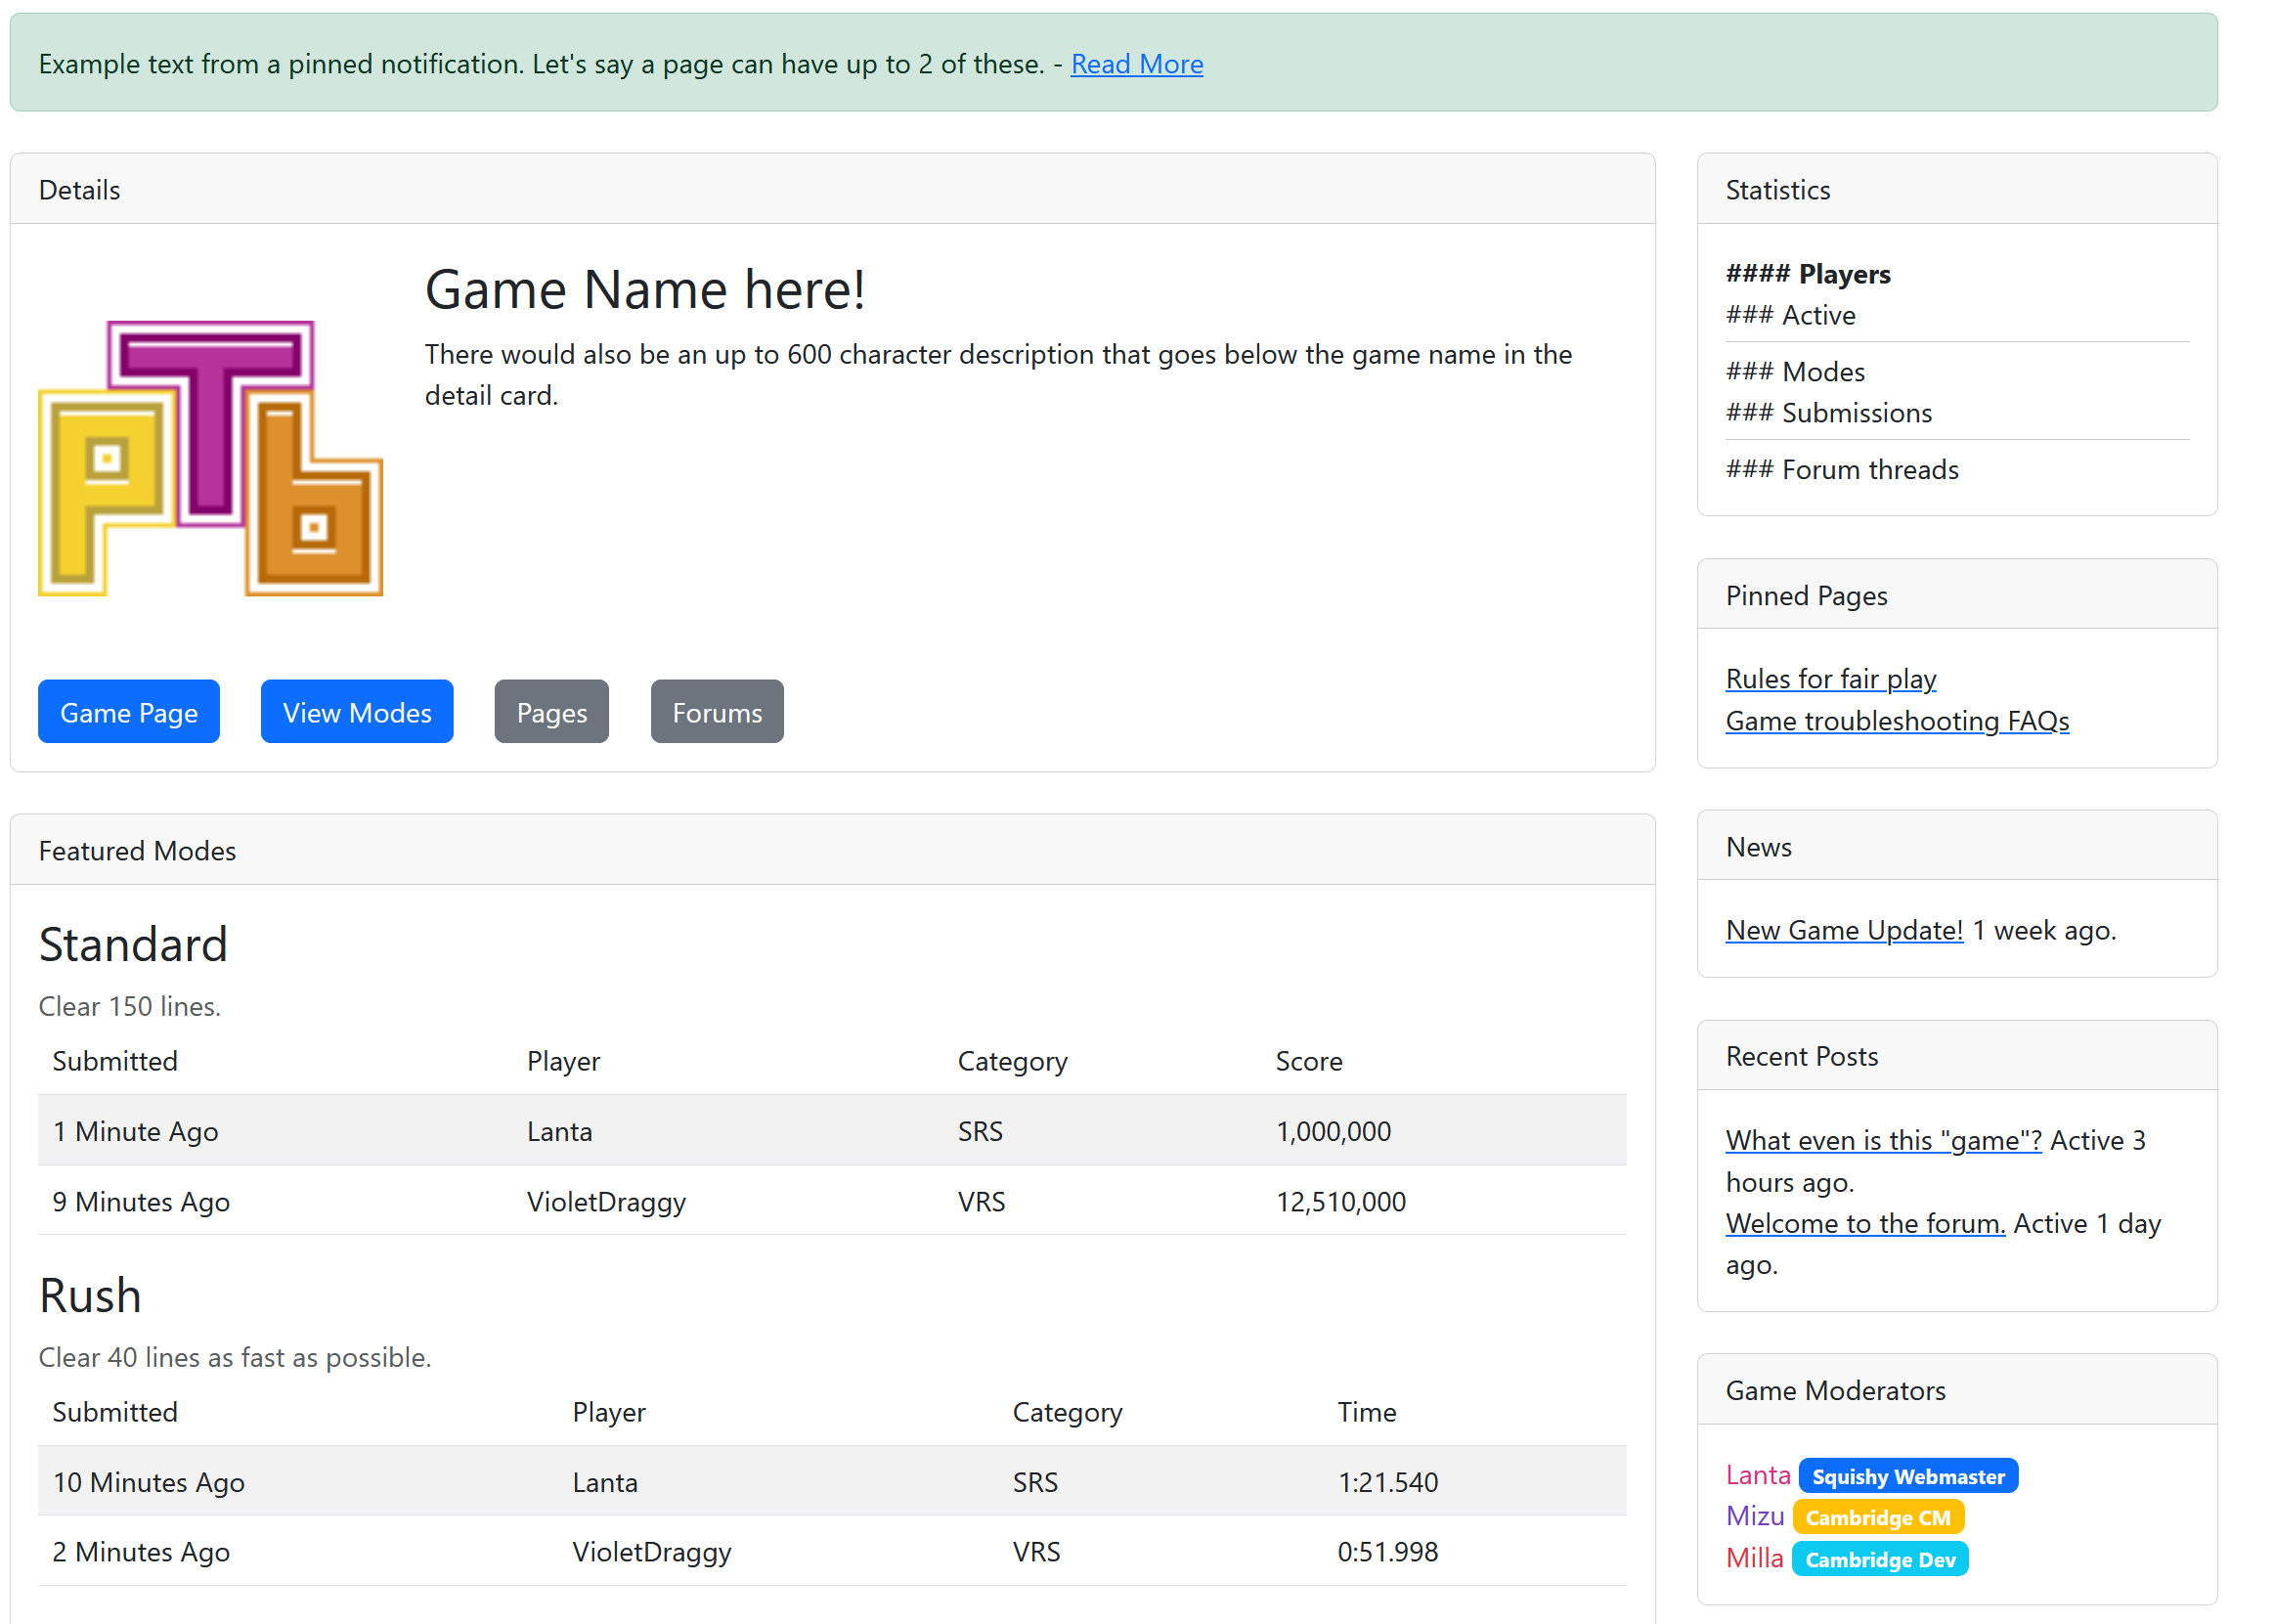
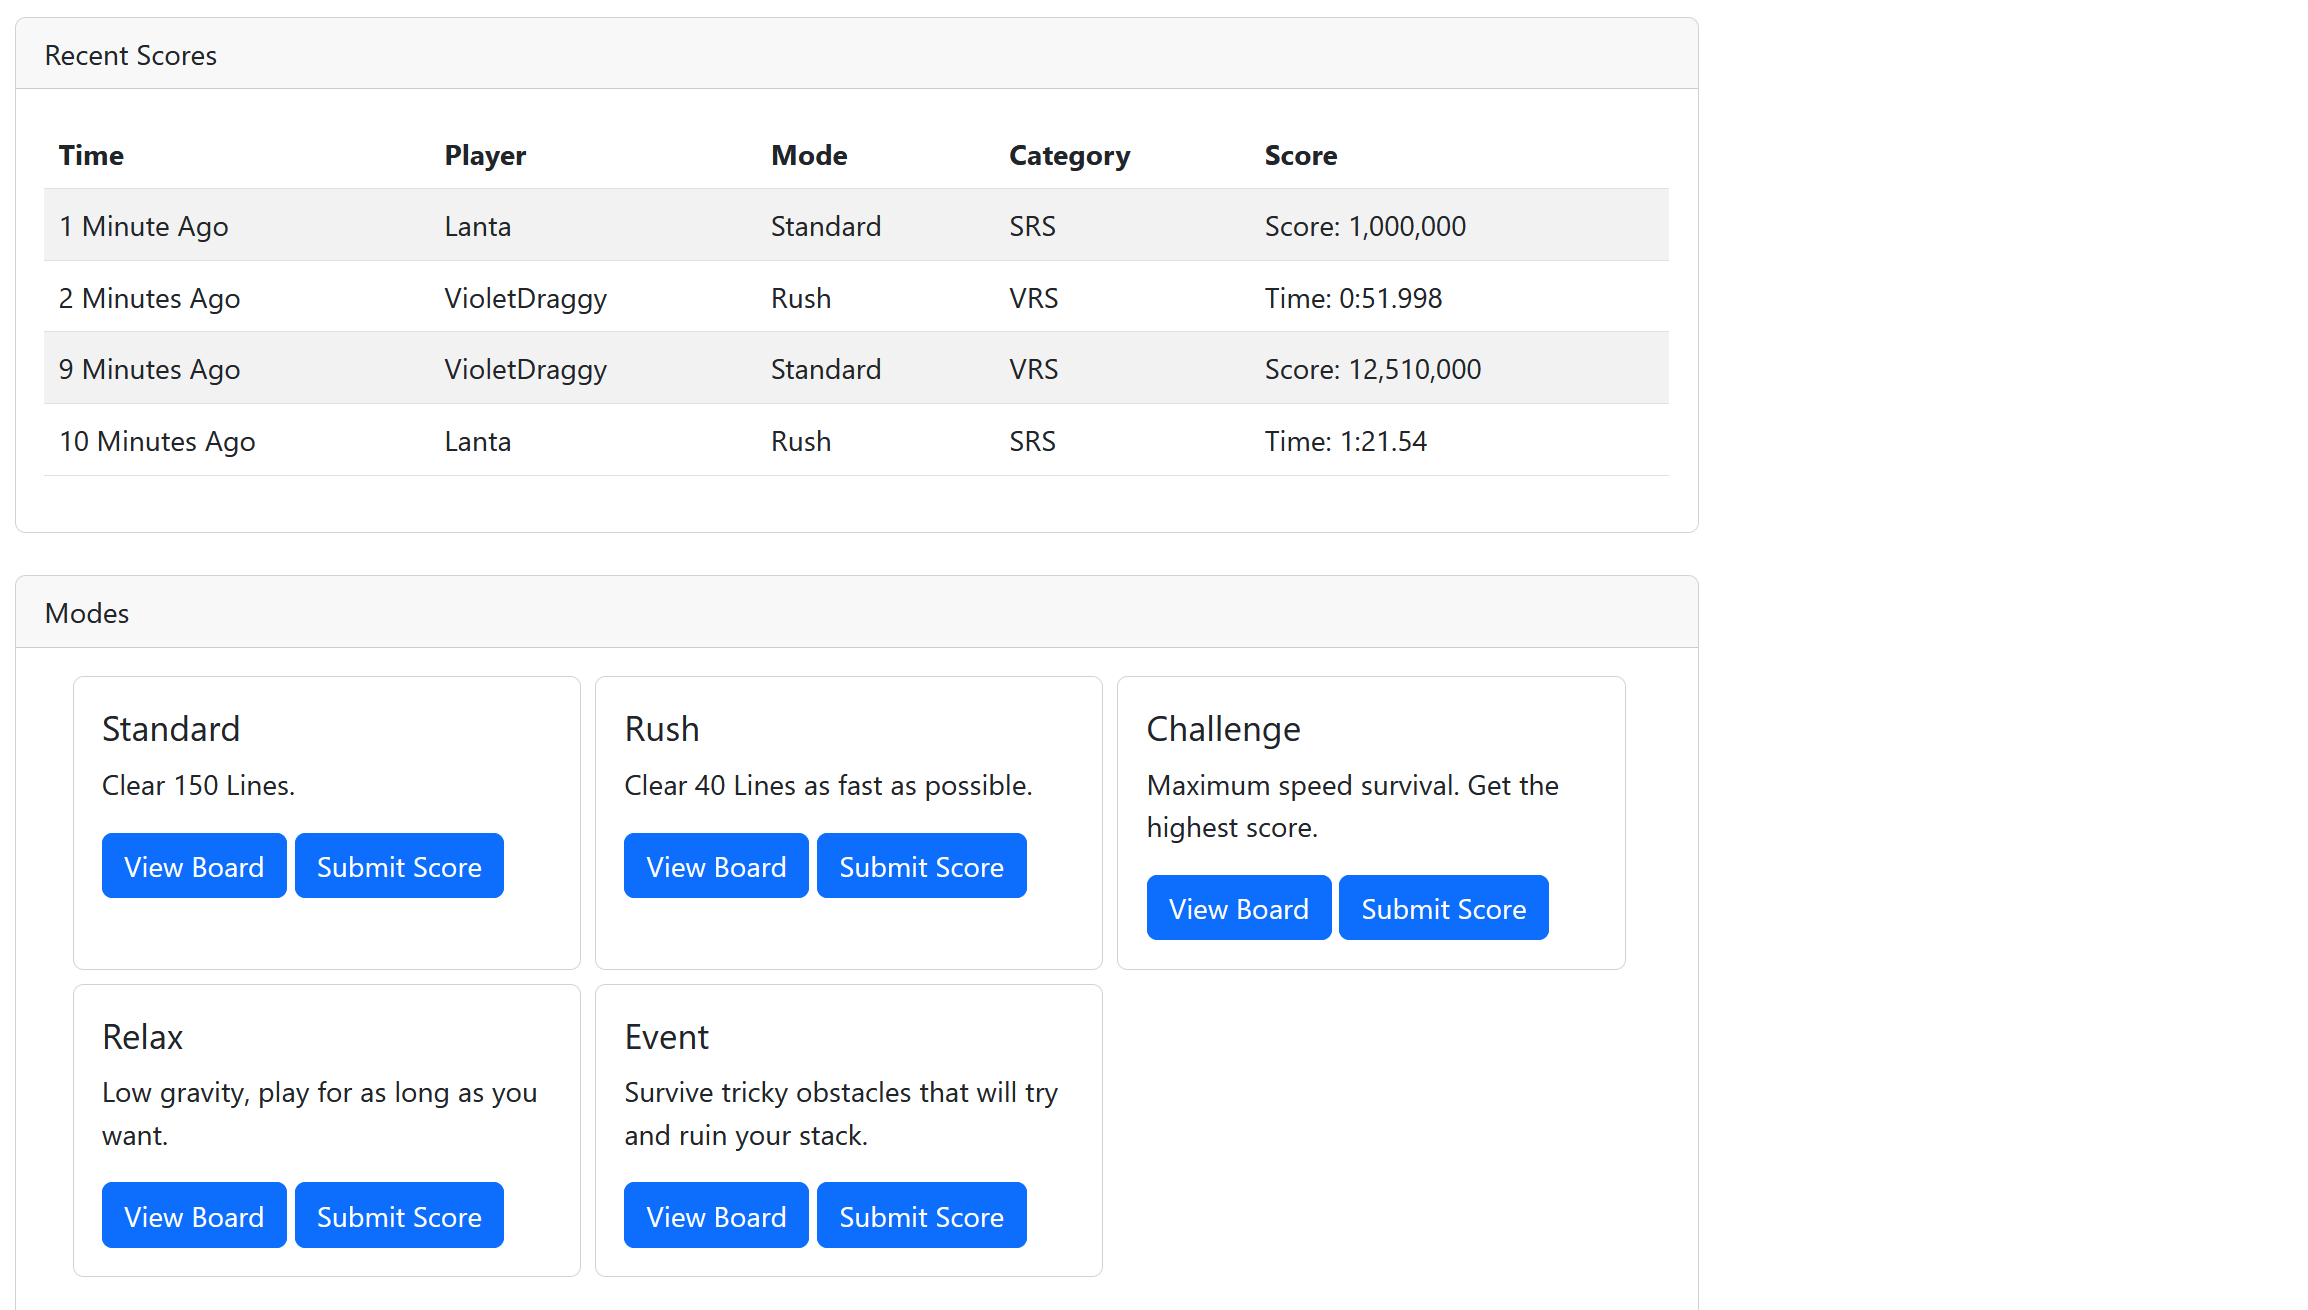
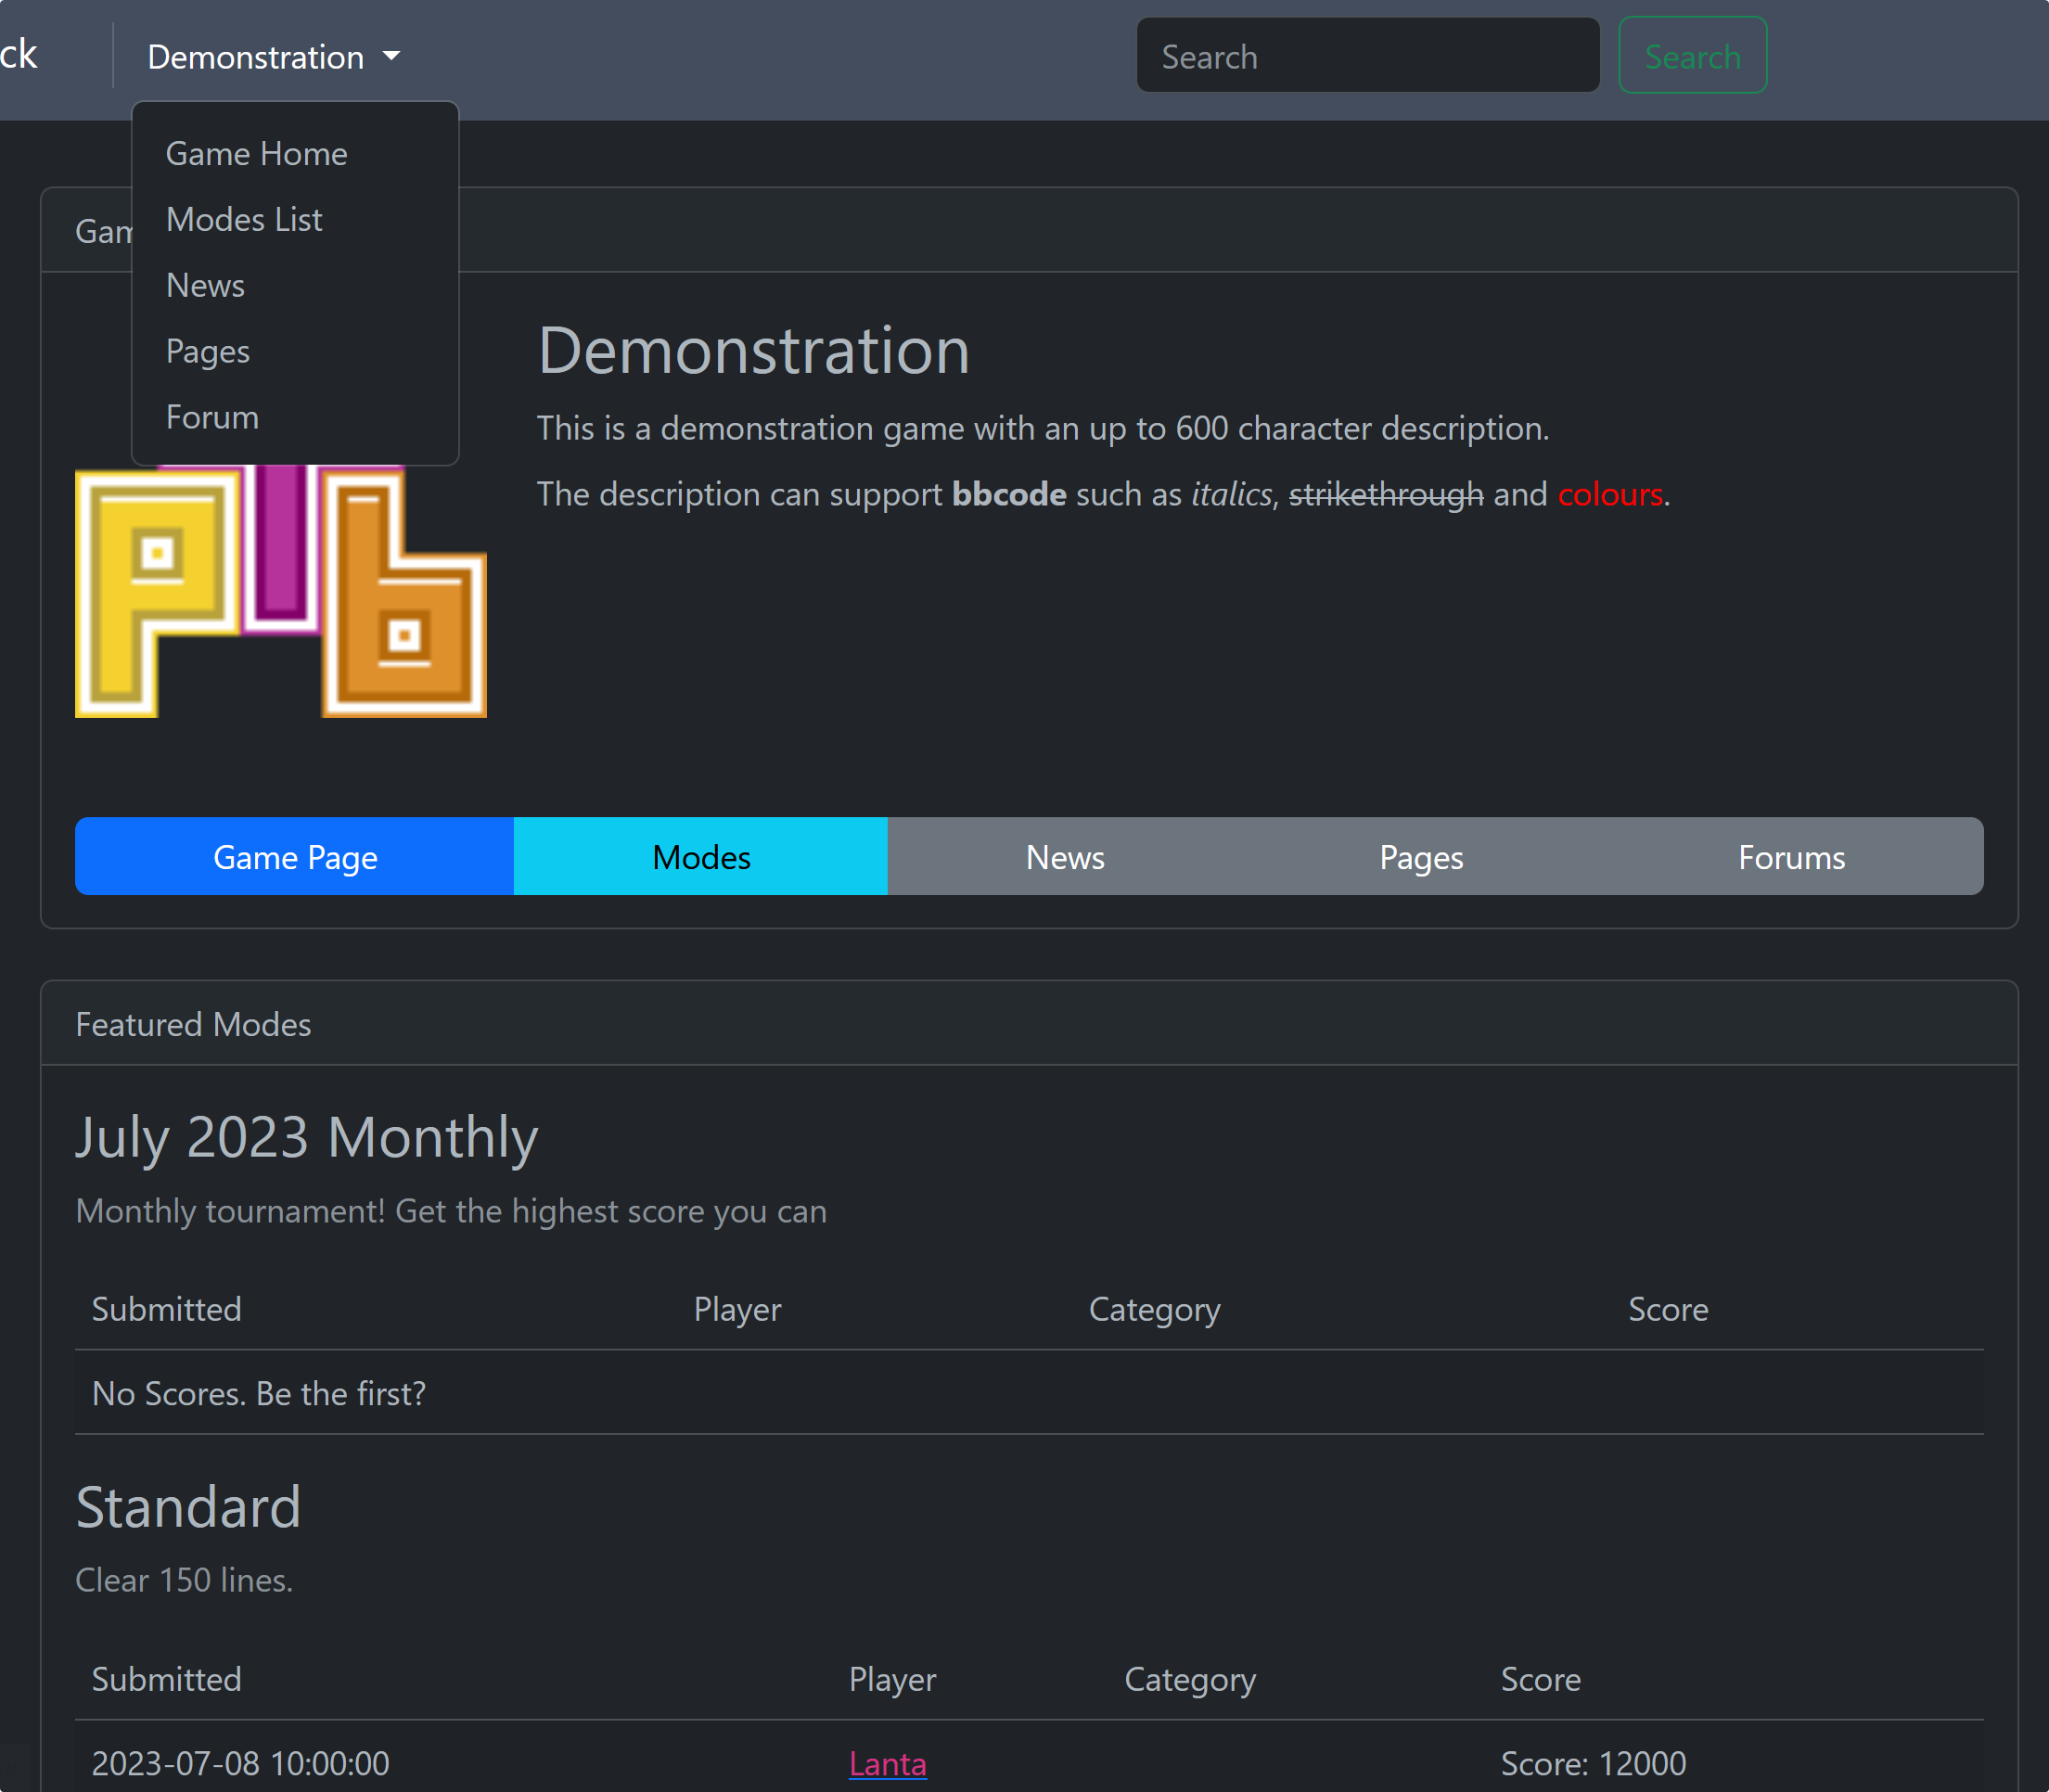
Let’s see what that looks like, I have a lot of development screenshots from while I was working on this, since I was kinda just venting to friends about my progress as I went.
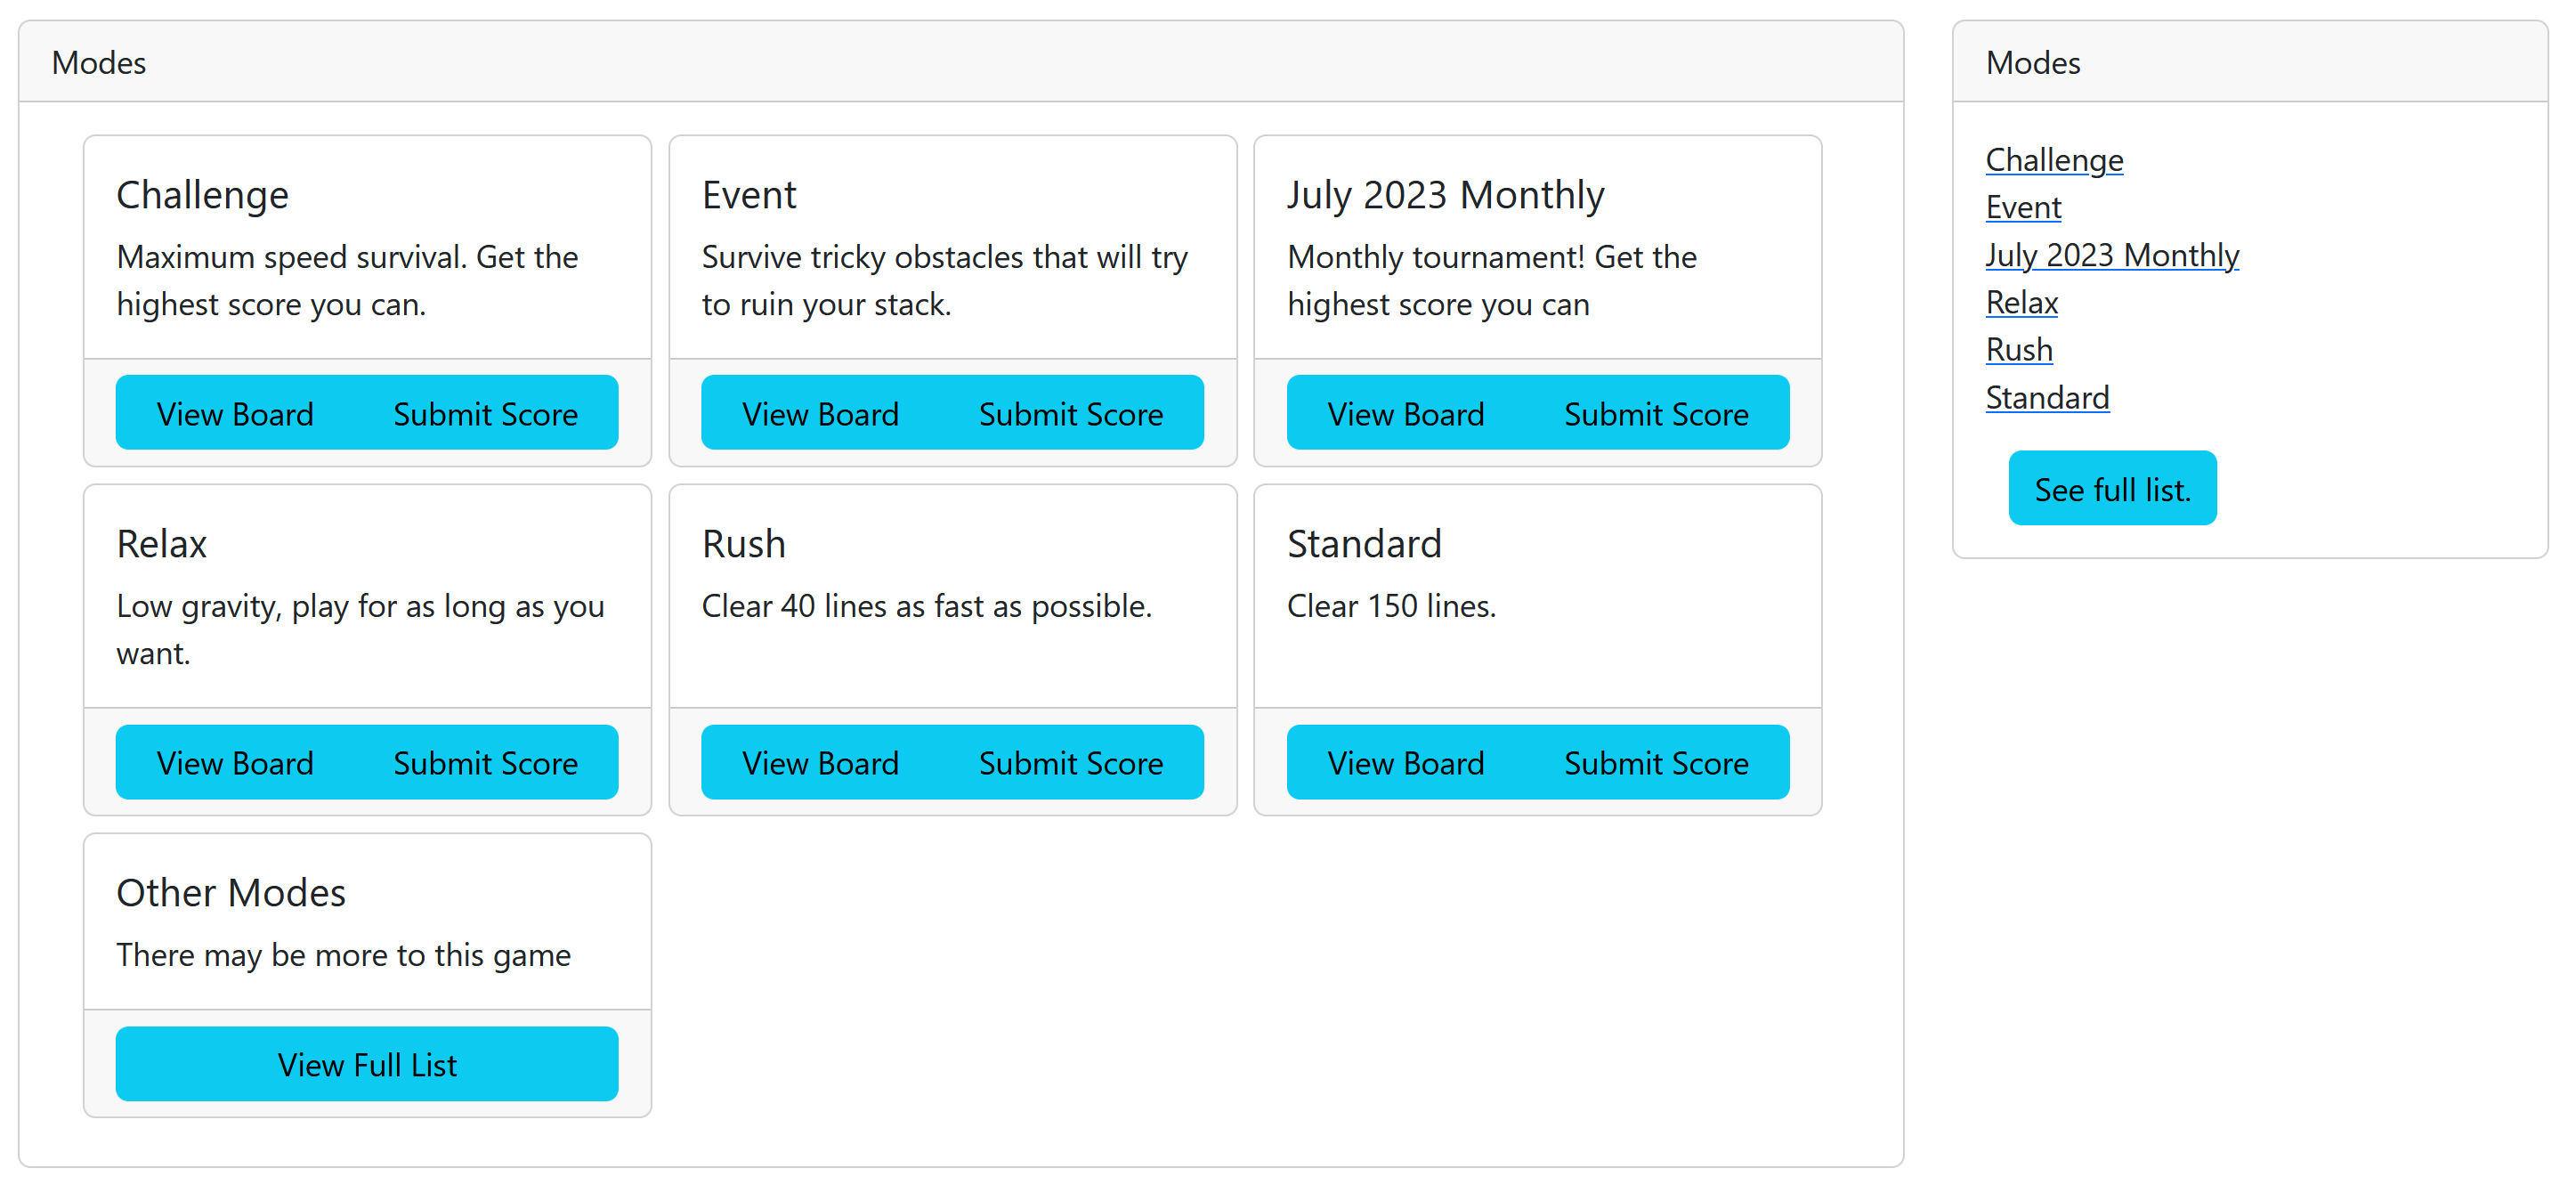
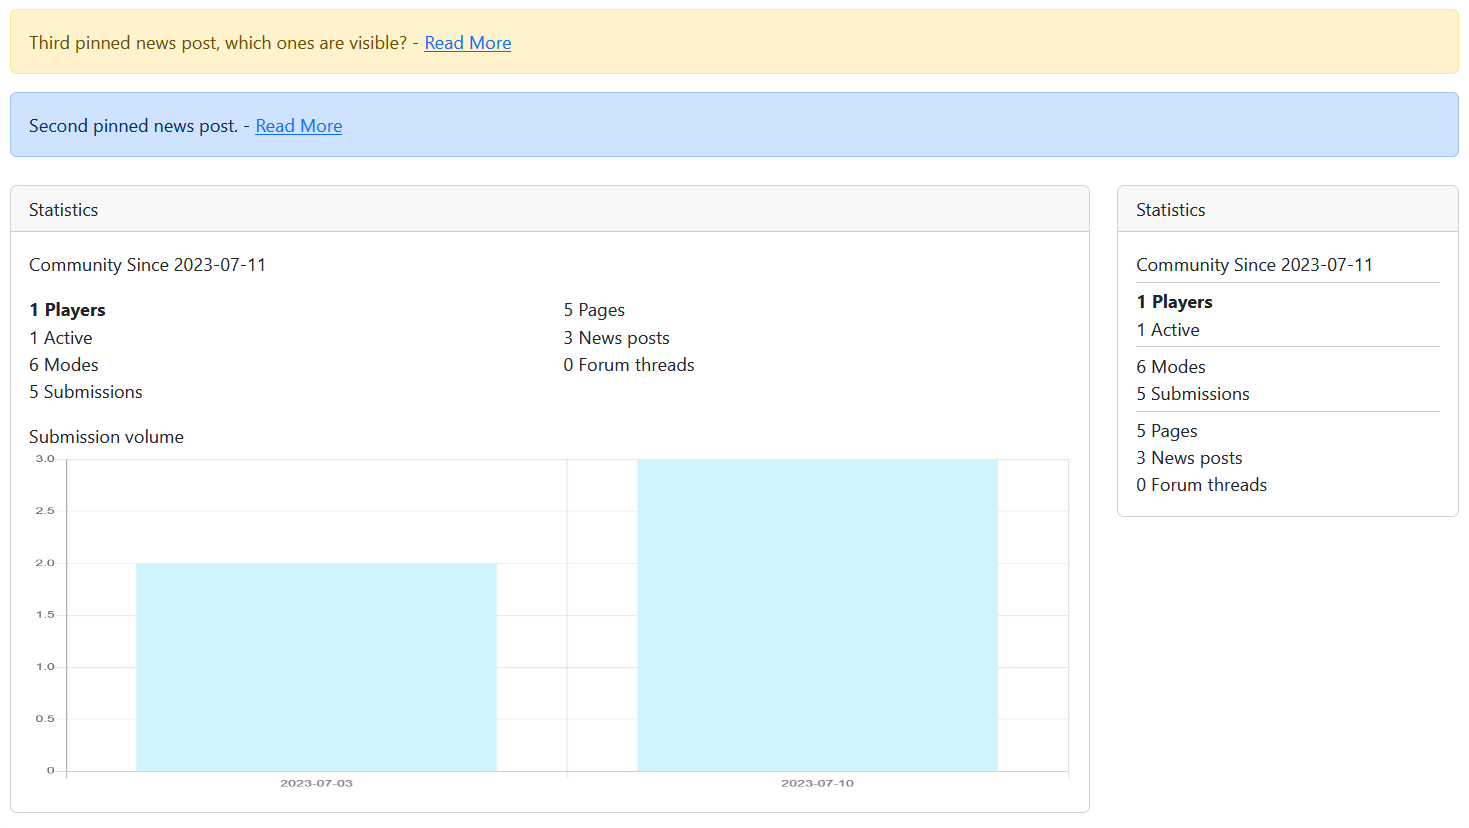
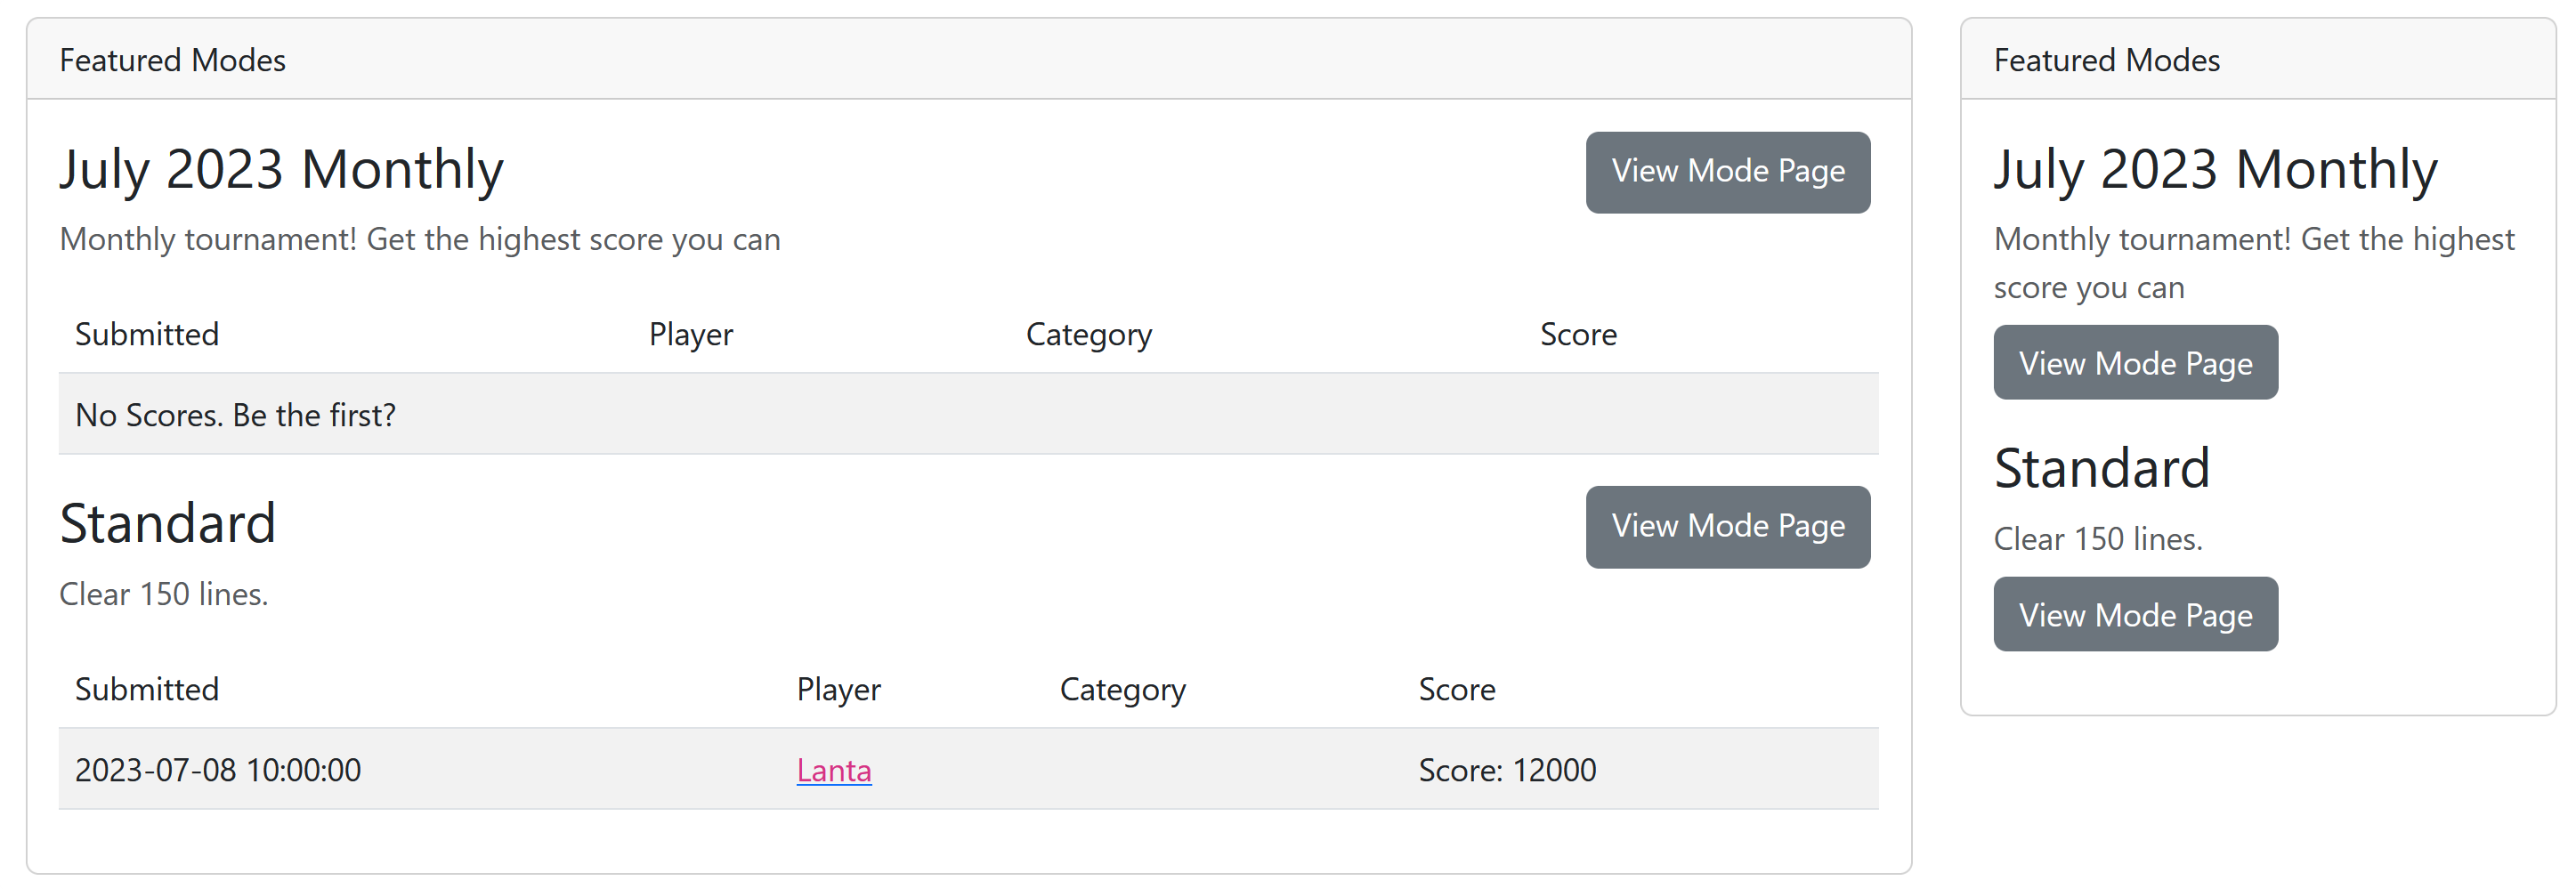
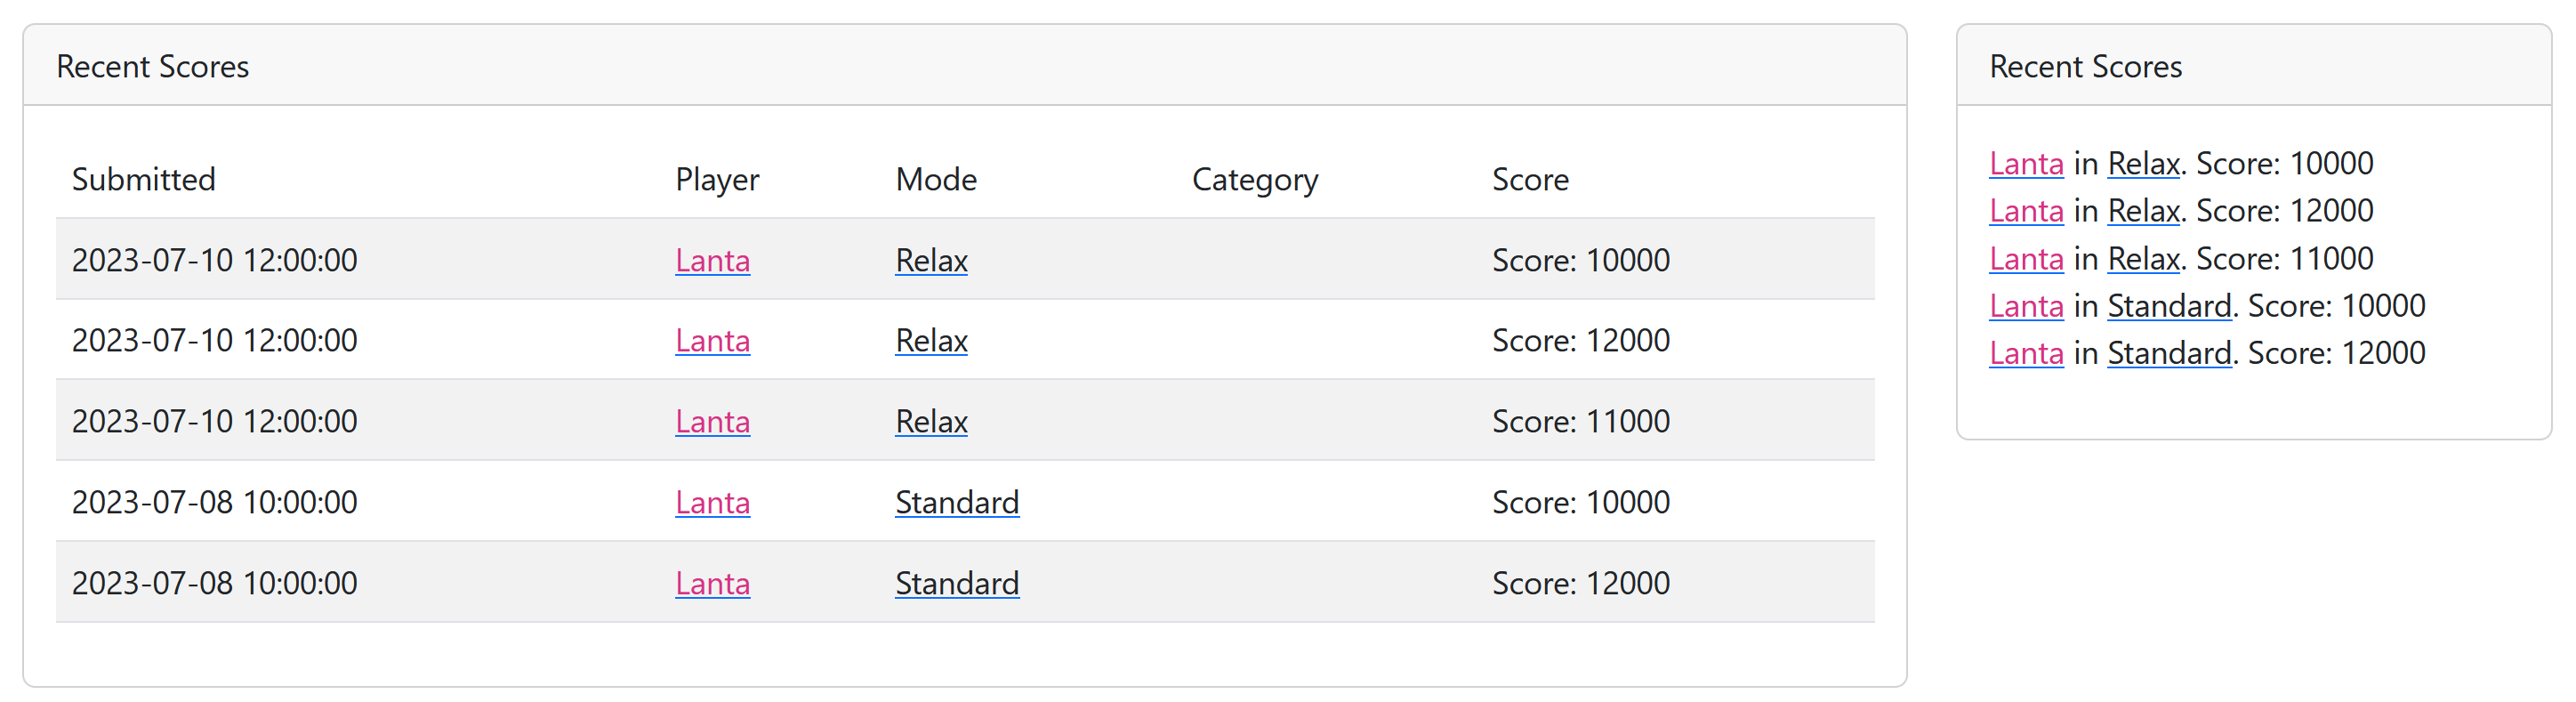
This is actually using live data, for as live as test data can be. It’s in the database and being pulled in from an XMLHttpRequest, so I’d call it live.
API Endpoints
Some of the panels above needed access to some data to populate themselves, so lets start working on the API.
Broadly it’s just gonna be the same as the website except the urls have /api in them, and they spit out JSON data. This is where I’m gonna be putting scores and stuff for retrieval. For now I shaln’t worry too much about public API for games to use, and just set up what I need to make the website work.
Broadly I need an endpoint to get the top X scores for a mode, for a given value of “top” since that’s customisable, and the latest X scores for a mode.
So for some semblance of consistency, I added serialise functions to a couple of models like Score and ModeOption so that when I need to output them as JSON, I can just call their serialise method. Here’s the serialise method for score for example
There is some things to consider here: User right now isn’t serialising the relationship, and I chose to do this because right now the data present is enough to render the user on the front page, without bringing in too much excess. I may potentially bring in the user’s badge at a later time, but for now this is the stuff that’s relevant for a score on the website.
Once this is in place, I can use some javascript to fetch relevant scores to populate the specific cards. The cards are all marked with a class to tell the JS where to put the data, and I’m using a bootstrap spinner to indicate that the data is being loaded!
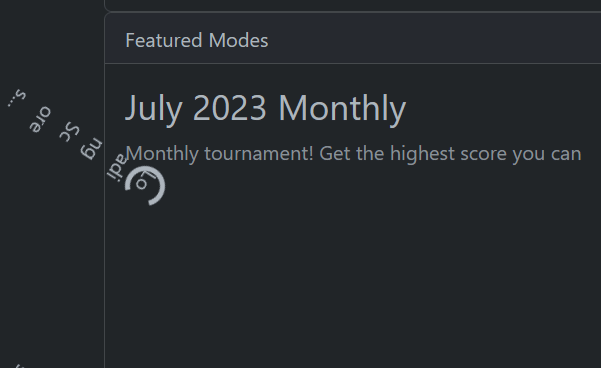
Whoops.
Oh I also implemted a rudimentary dark theme. The game settings has a dark mode toggle, and when it’s set I add data-bs-theme=”dark” to the html block, and it makes everything dark theme. The colours in BS5.3 haven’t been refined yet though, so I’ve tweaked some of them with some custom CSS to change the colour variables when dark theme is turned on.
I’ll get back to where it says “supports bbcode” later…
Anyways, let’s put it all together.
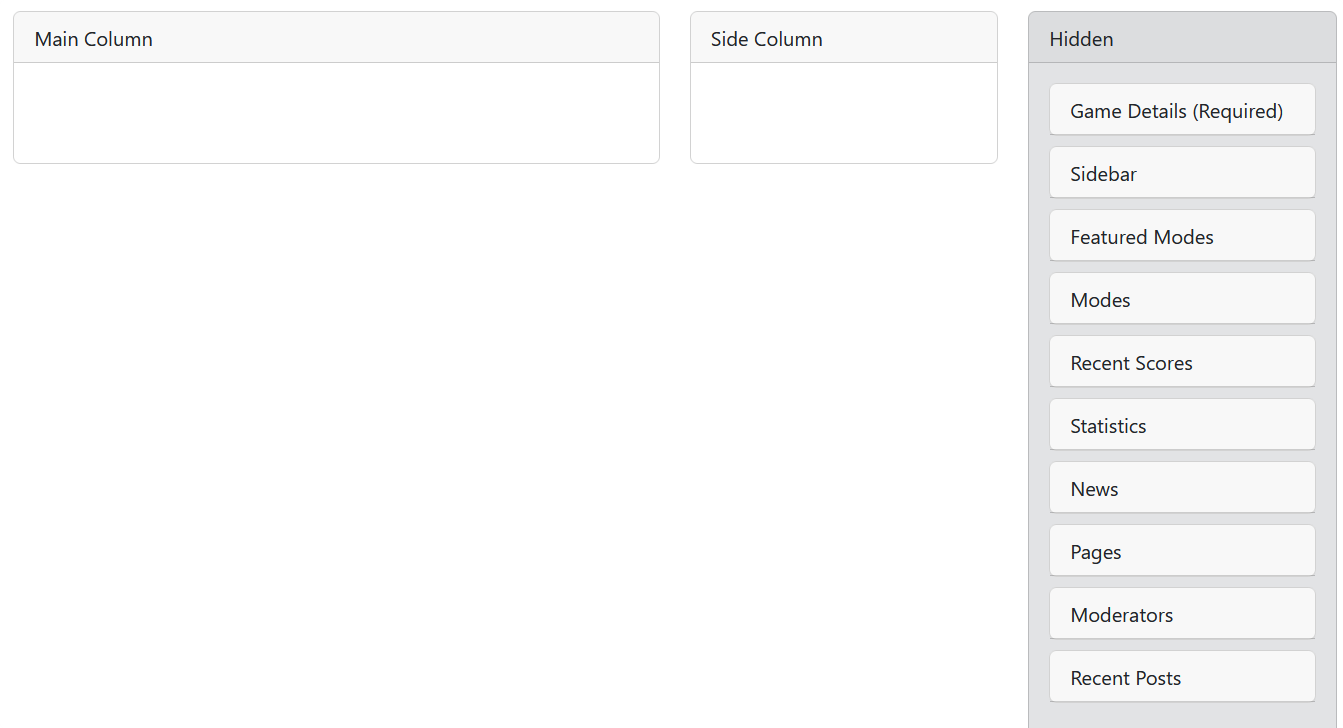
I added two columns to the database game table for main and side columns, each of which is just a list of keys, and then in the template, I’ve lined up all my card functions with those keys because turns out jinja supports first class functions.
{% set cards = {
"detail": detail_card,
"featured": feature_card,
"recent": recent_card,
"sidebar": sidebar_card,
"pages": pages_card,
"modes": modes_card,
"stats": stats_card,
"mods": mods_card,
"news": news_card,
"forum": forum_card,
} %}
...
<div class="col-md-9">
{% for card in game.main_column %}
{{ cards[card](False) }}
{% endfor %}
</div>
<div class="col-md-3">
{% for card in game.side_column %}
{{ cards[card](True) }}
{% endfor %}
</div>
This is how I achieve customising the layout of the homepage. Unfortunately the main column with right sidebar structure is a constant, but other than that, it’s all good, well almost all good, you might have noticed an issue: It’s not actually customisable yet.
Game Settings
Time for the next big challenge. There is a huge amount (diplomatically, I believe the term is “arse-load”) of stuff that the game admin peoples need to be able to edit, from the main settings, to game modes, to homepage, to even permissions and roles for their game. Thats a lot of work for something that only 1% of the site users are going to see, but it’s gotta be done otherwise 1% of 0 is still 0.
So lets think about what sorts of stuff we’re gonna have to be able to edit:
God damn there is so much stuff to edit.
So anyways, The first thing I did was much the same as for the user profile editor (which I will come back to when the forum stuff is a bit more fleshed out), and worked on the game overview settings: Very simple, just a single template and a single form (again, wtforms here for the massive assist.)
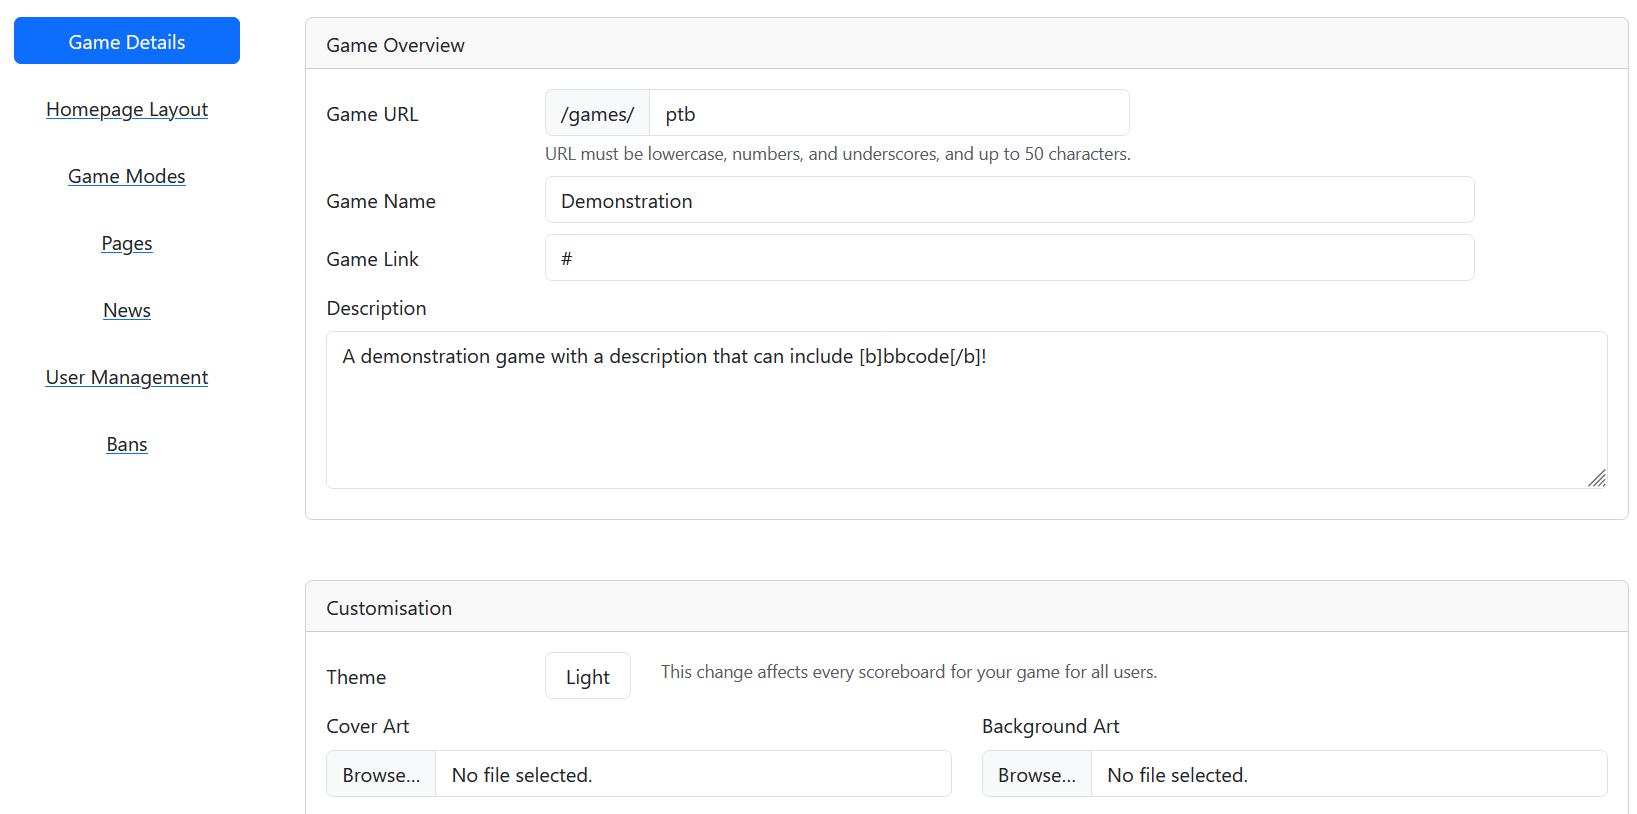
The upload buttons take the files, checks that theyre images, and then saves them in user-content/game_id/cover.ext and user-content/game_id/background.ext. I’m hesitant to add more file hosting on a per-game basis, because the hosting service I’m using is a shared hosting setup, which has the benefit of unlimited Postgres and file storage bytes, but a maximum amount of file system inodes I can use, which not only includes stuff like my website files, PTB website files and user content hosted on the server, but also my emails count against the limit whoops.
The user settings was a little bit more complex, since I needed a CRUD (create, read, update, delete) interface for it. Unlike games and profiles, I can’t just assume that the data needing editing already exists. 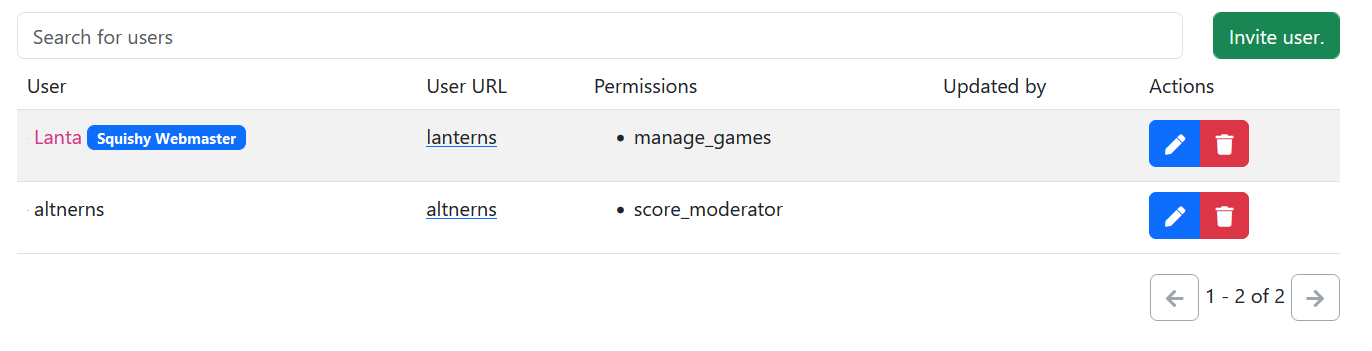
So I broke the interface down into three parts, an API that gives me all the relevant data for a user’s permissions on a game, a template that will query this API to create pages of 50 or so users, as well as allow for searching, deleting, editing, and creating new users, and a template to create or edit a set of permissions.
The form has a section that is hidden depending on if a new user is being created, or an existing one edited, which allows for, uh, I won’t say searching (I don’t really know AJAX enough to make select2 do funky things), but it can at least validate the input after it’s entered.
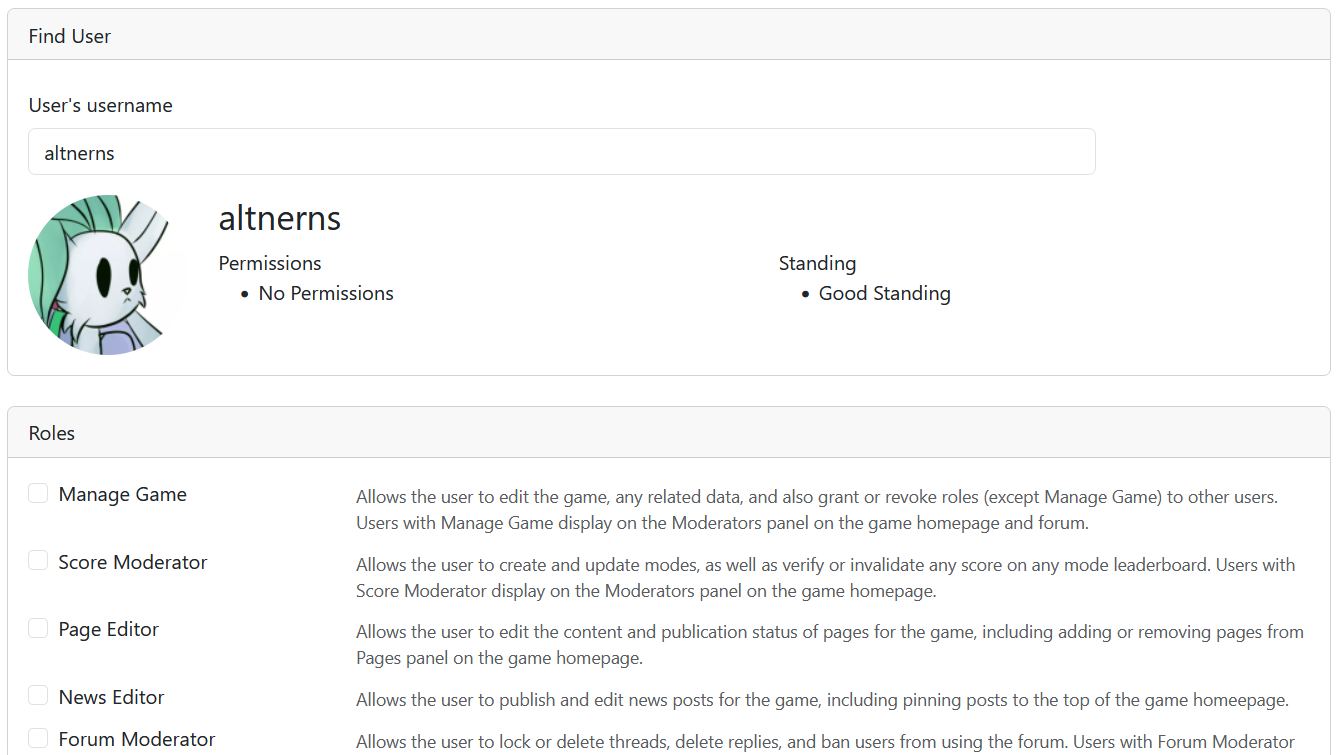
After entering a name, it’ll query for that user’s details, and tell you what’s going for them, or if your input is busted, it’s not perfect, something like the search bar on speedrun.com which can show you search terms as you type would be incredible, but I can figure that out at a later date.
Same settings in the bans tab by the way– Is what I would be saying if I didn’t just realise that I’d left the invite button from the user roles list page on the bans list page when I went to go and get screenshots, whoops let me go fix that real quick… For most of the stuff I’ve written, I’ve had screenshots prepared already as I was sharing progress updates with the guys on the Cambridge (tetris not city) server, but most of the settings stuff I did in my down time while I was abroad in France with the partner, so I spent considerably less time chatting than I did before and after, so I also have considerably fewer screenshots.
Anyways, thats fixed now.

The trashcan icon is for unbanning, might need to find a better icon for that,,, and the forum actually has three states instead of 2, the extra being an intermediate warning state, which is intended to block users from creating threads, amongst other things. There is still a lot of planning to go into the forums yet. If you can’t tell it’s still a very nebulous wishlist sort of deal right now.
But anyways, thats the easy stuff out of the way.
The part where I nab a chunk of code that I researched back in 2020 for work but never ultimately ended up using.
Thats right, we’re talking about how to do the homepage layout stuff, and lucky for me, I already did the 20 hours of research that it takes someone with only cursary experience in JS to sift through all the various shit that I could use to implement draggable elements between multiple containers, before biting the bullet and learning some basic jQuery.
So anyway, I’m using jQuery.sortable, though there are some things I do need to double check to make sure things work.
First up, whats the big idea? It’s simple really. Let’s have some columns and some boxes to drag around.
Well, thats pretty boring, I did some magic though.
So the left column has the class .main-list, and the middle has .side-list, and then with a little bit of css, well,
.main-content,.side-content {display: none}
.main-list .main-content {display: block}
.side-list .side-content {display: block}
.no-list .card-body {display: none}
Suddenly I can have a card body attached to each block with a <div class=”main-content”> and a <div class=”side-content”>, and which one gets displayed depends on which column the block is currently in, for example:
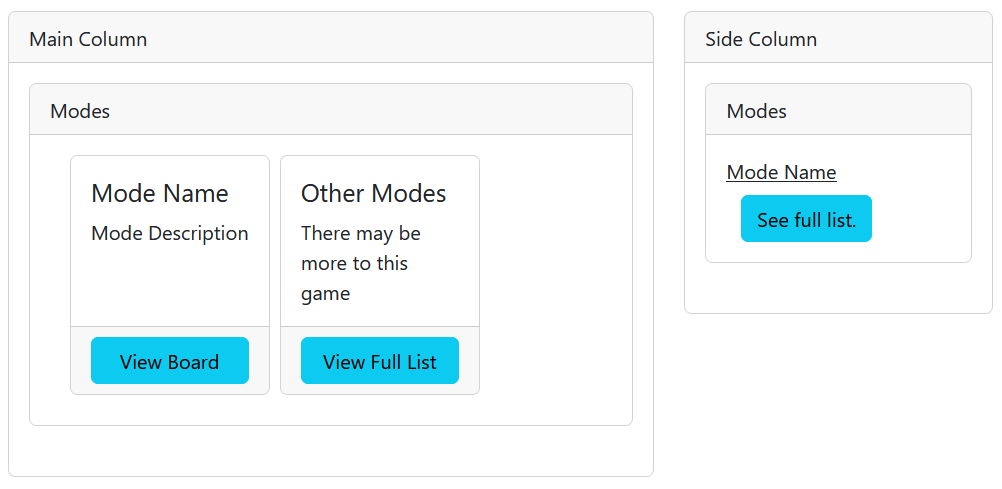
(Note that I duplicated the DOM node in order to show both of these at the same time. Normally each card will only be in one column.) Each card style is designed to look about like what the card would look like on the actual homepage, albeit simplified slightly.
The update function on the jQuery sortable actually does two things, firstly it checks that the details card is always at the top of the list it’s in, as well as disabling the update button if it’s not in one of the columns, but more importantly, whenever a card moves, it silently updates a pair of hidden formfields so that when the update button is pressed, it can post those fields back to update the columns on the homepage.
I also use jQuery.sortable on the mode edit page for the columns, and by god those were a ballache to set up.
There is a lot to talk about here.
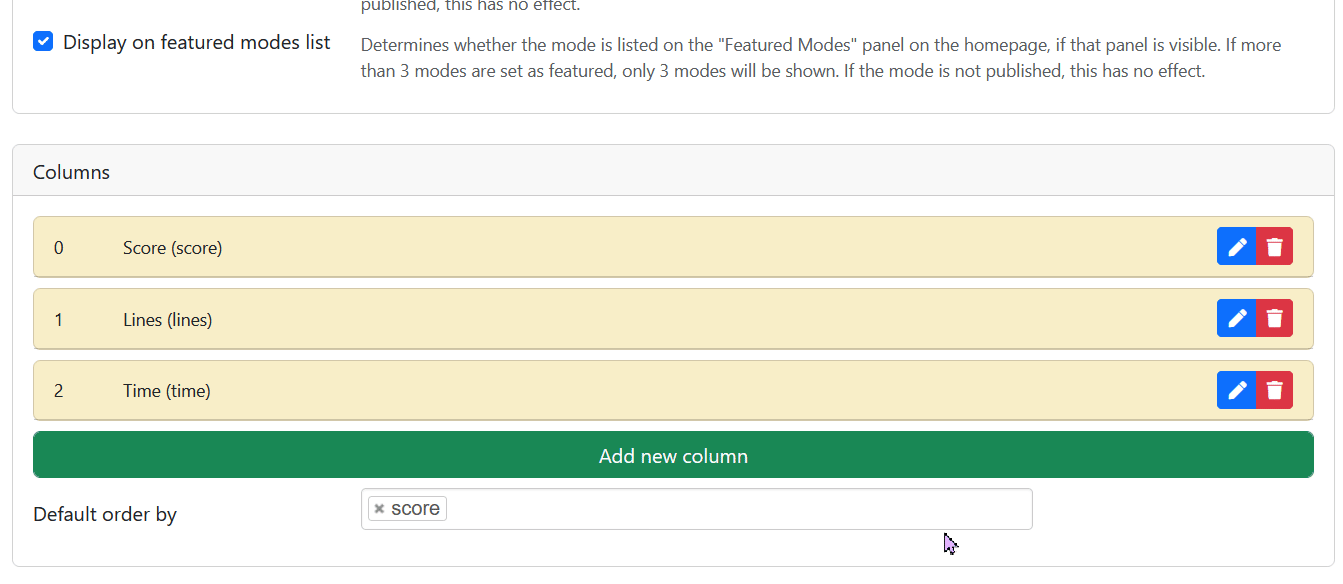
firstly, the way this form is set up is by using the wtforms FormField field, as well as the FieldList qualifier, which basically means that it will not only embed a subform into a form, but multiple of them. The way that this is exposed on the HTML is by using the ID `{fieldlist.name}-{index}-{subform.field.name}`. This is gonna be important to know, because while it’s super easy when a FieldList of FormFields is static, it makes it harder to dynamically add more.
So the green button that adds new columns relies on two facts: First, the index starts at 0, so the next index is automatically just the current size of the list, and second, the size of the list never shrinks.
While there is a trash button, what it actually does is set a hidden checkbox on the form to indicate that it needs to be deleted. (This also saves me having to diff the existing list with the incoming list to figure out what needs deleting by making it more explicit.) For columns that existed when the form was opened too, the delete button becomes an “undelete” button to allow users to undo deleting any columns until the form is submitted.
For new columns, the same workaround with the deleted checkbox is done to mitigate rare edge cases where someone does uhhh
- Add 2 columns ([0, 1])
- Delete the first column ([1])
- Add another column ([1, 1])
- Break the form by submitting index 1 twice.
So new columns instead have a second checkbox set, which is used by the delete button to check whether it should change the column to one that can be undeleted, or if it should just outright hide it.
Then when the validation script is checking that all the inputs are unique, it can just disregard the entries where the deleted checkbox is set. Automatically throw out anything that’s both new and deleted, delete any columns that are deleted, rename columns that are changed (we do this first so as to not accidentally encounter any database level integrity errors adding in new columns), and then finally add the new columns.
Everything else on the mode form is just normal inputs.
I haven’t made the settings for the page designer yet, and it’s for a good reason I swear
AKA How I started dabbling in loosely documented open source 2011 technology.
Like one of the pieces of documentation refers to a page that has since been deleted from the mozilla docs and I had to use the wayback machine to see what it said.
Let’s talk about BBCode.
So the biggest issue with BBCode and the reason why Markdown even exists is that BBCode is a pain in the ass to write, a pain in the ass to read, but incredibly easy to parse into HTML. The way most forums got around using it is by including a rich editor.
(I suppose technically it’s a WYSIWYG editor, lemme look up the difference. Huh, turns out the only difference between a rich text editor and a WYSIWYG editor is that the output HTML is the same both in the rich editor and the rendered HTML. I’ll have to keep that in mind, because uh, there is something else that I’ll have to take into consideration there uhhhh.)
Anyways, my rich editor software of choice is frankly the first open source one I found. SCEditor, by Sam Clarke. It does two things: 1, it’s a rich text editor, and 2, it lets me define custom commands and BBCode for the buttons. This is gonna be useful, because there is some custom BBCodes I want to add that just aren’t normally around by default (e.g. instead of having a [size] tag, I want [heading], [subheading] and [sectionheading] tags for consistancy throughout the site, which I’m gonna map to h2, h4 and h5.)
Heres where the challenges start though.
It’s very easy for me to add custom BBCodes to the parser provided by python’s bbcode module. I just tell it what tags to look for and give it a string to substitute the value in, or a function to call that returns the substitution.
It’s a lot harder to figure out how to do it on SCEditor though. Thankfully there are some documents that get me most of the way there, but there is a lot of work to do.
I am bad at graphic design.
So anyways I started artin’.
Turns out that the editor comes bundled with a set of wonderful CC-BY icons from Mark James, but the issue with stock icons is that it doesn’t open itself up well for custom icons.
As a bonus headache, these icons are all 16×16 pixels.
They also maintain a consistent artstyle.
That last part, unfortunately, is an absolute deal-breaker for me.
So I decided to challenge myself. I decided to try and put together an icon set under 2 restrictions: 16x16px, and the only colours available are black and white. And well, here’s how I did.
![]()
Feel free to upscale with browser zoom or whatever.
I only ended up needing like half of these. The editor is pretty comprehensive, and does a lot of good work, but it’s far too advanced for my use-case, and while I did end up implementing a few of the things on the python side that are in the editor, like right-justify and youtube embeds, a lot of stuff just hasn’t been.
All the icons on the first 5 rows, as well as the grab handles in the bottom corner are in the same order as they are in SCEditor (though in the original, theyre aligned in a single column, and the CSS to specify them just shifts the image up, whereas I arrange them in a grid and have to shift the image both up and right.)
The sixth row is my custom stuff. The header buttons honestly I’m surprised weren’t around, but I guess if I had a text type selector between paragraph and heading, that could have used the icon for font-size, but I think the font-size command in SCEditor emits [size] blocks, and I didn’t feel like figuring out how to override that.
The other parts do a bit more stuff.
The info icon is the button for [nosidebar], which is a custom code that hides its content when it’s being rendered outside its usual context. For pages, this is when they show up on the homepage (in fact, the name of the tag comes from the sidebar page being tied directly to the page located at /games/<url>/pages/sidebar.) For modes, this is when the description is used on the homepage or mode list cards. This button won’t show up at all when I use the editor in forums.
The last three are super custom codes, albeit slightly less in the spirit of WYSIWIG. From left to right, Card, Fumen1 and User.
The Fumen button (which is styled after the Harddrop.com logo, since the fumen.zui logo is trash,) is like the YouTube button, it takes an input and creates an iframe. For the YouTube command/code, it embeds youtube, duh, for the Fumen one, it takes a pretty arbitrary long string that at this point in time starts with “v115@….”, wraps it in [fumen] tags, and then embeds “https://harddrop.com/fumen/?m<code>” in an iframe.
And this took me 5 hours to get working.
I had to learn how to debug js code in the browser to figure out why this wasn’t working, as well as swap out the minified js for the development source (thank god for open source,) which eventually led me to an undocumented option that can be passed into the constructor for the editor instance called “allowedIframeUrls”. Turns out what was happening is that when I was trying to return an iframe for Fumen, it was being picked up by a piece of code that automatically scrubs xss and other abusive stuff from the incoming HTML fragment, and one of the checks is to ensure that only allowed URLs are used in iframes. If they aren’t, then they get deleted. So basically it took me 5 hours to learn that to make Fumen embed into iframes, I had to add ‘allowedIframeUrls:[“https://harddrop.com/fumen”]’ to the editor options.
The other issue I had with Fumen is that turns out the way it draws out the field/table isn’t 100% consistent, so while I managed to nail down the pixel size of the field on my laptop screen, when I tried it on my desktop, it was ever so slightly too small, and was showing scroll bars. I’d programatically try and figure out the size of the output, but due to how cross-origin security stuff works, trying to do iframe.document.scrollHeight fails because a parent document can’t access attributes from an iframe document. Something to do with embedding websites with password inputs or smth idk. So I kinda just had to leave 20 pixels of padding on the right and top for it to use when it decides to draw a bit bigger than expected.
The other two, Card, and User, (and to an extent, the nosidebar command) don’t quite fit the “WYSIWYG” monicer quite right, perhaps what I should do is add a command to toggle sidebar view that hides sidebar content,… Actually that’s a fantastic idea, let me give that a shot. . . .
That took longer than I expected and doesn’t even tackle weird whitespace, but then again, I don’t think any editors can tackle weird whitespace, so I’m gonna call that good enough.
Where was I, Oh right, cards.
So since the entire website is built on top of these god-damned cards, I wanted a way for users to be able to add them too. So I came up with a [card] instruction. On it’s own, it’ll create a card with just a body and have whatever text is inside it, but it takes a “header” argument, which will put the header text into the card header, as well as a “role”, which can be one of the bootstrap content roles (success, warning, danger, etc) to set the colour of the card. Unfortunately for the editor though, this comes with two issues.
Firstly the way to draw the card. I render the whole card as a div with a couple of styling classes on it, but this comes with some limitations, first up I can’t style the header differently (the card header is just treated as everything before the fisrt linebreak), and I tried to get the “:first-line” selector working, but firefox just wasn’t having it for some reason. And secondly I don’t have a colour picker for it yet, but I might be able to figure out how the built in “color” command in sceditor works, and use that to decide.
The “user” command isnt implemented yet, but will take a user’s profile url fragment, and return a properly embedded user. On the python side it can take the bare arguments “avatar” and “badge” to render stuff before and after the user, but idk how I’m going to make that work on the editor in the slightest… I’ll probably have to play around with classes.
So all that said, here’s where my editor is at for now, and you can see the icons looking distinctly not shit, which impressed me for the amount of restrictions I was working with!
The extra “i in square brackets” icon is the thing I just added. I decided that the i in square brackets would work as a “nosidebar” command, and the full sized i icon hides anything marked with nosidebar from the editor window, to make it easier to see what content would be visible on the sidebars. Albeit, the whitespace doesn’t and probably wont ever work properly. The BBCode render on the python side does a small amount of post-processing to remove duplicate newlines from the output, and there is some CSS that removes any newlines following nosidebar blocks. I can’t get this to work on the editor though because blank lines on the editor are just <div></div> and I don’t know if “.sidebar .nosidebar+div:empty” would even work.
The editor also has a habbit of adding a bunch of [left] tags, which is a bit of a pain and the python renderer just ignores these.
Onwards
Wew I did a lot in France, didn’t I. For now though I think I’m going to finish up the editor, tidy up the card command, implement the user command, maybe I’ll think of other useful features to add, and then with that done I’ll be able to create the page and news post editors and settings which should round off the game settings page, and then I need to create a mode list and mode page, as well as a score submission form, and at that point the site should at least be minimum ready to use.
Of course I still need to build an API for games to interact with to automatically submit and retrieve scores, but I can do that after finishing up the website.
Oh, and a homepage. I need a homepage.
Cya whenever, I’m going back to my cave.
1: Fumen is a Tetris field planner/viewer. The planner lets you draw out fields, place and move pieces, and capture each step of the process as a frame, then the viewer lets you see each frame of data as a slideshow.
Leave a Reply